Thank you for stopping by – I hope you all had a good week.
Please accept my sincere thanks for your sweet messages from my previous post. You took the time to let me know that you appreciate the little Craftberry Bush and that made my heart smile. Sometimes we just need a little pat on the back and a word or two to encourage and keep us going. So I thank you from the bottom of my heart.


So today I’m skipping the colourful side…

and showing you this…

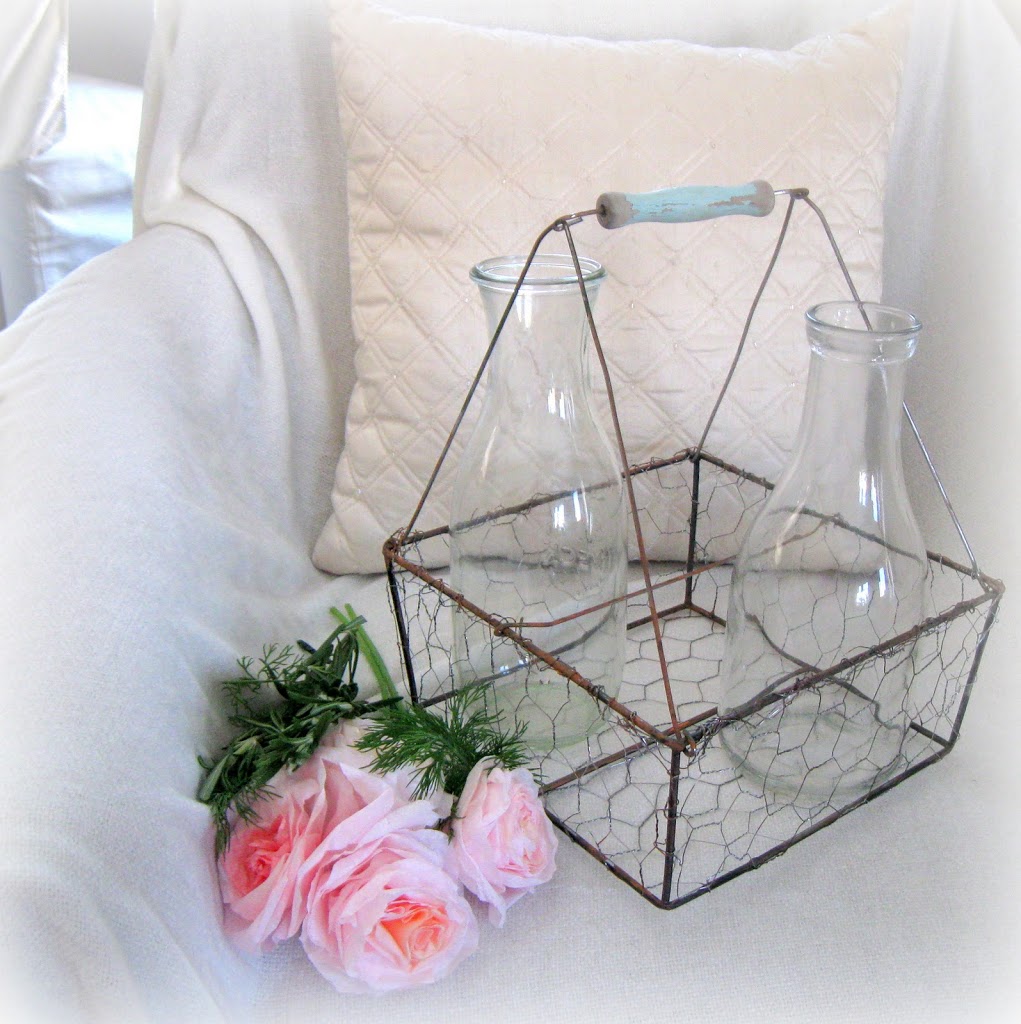
A beautiful old wire milk basket.
Look at that patina…ahhh
Can you hear the stories this little basket tells?
(although “Milkman” stories don’t always end too well, do they?)

Are you tired of those jars yet?

Rusty and perfectly imperfect, but I can’t for the life of me remember where we picked it up. Was in that little village in the South of France…or that quaint town in Spain? It may have been during our summer in Tuscany?
In my dreams.
I actually picked it up at the Dollar Store. Yup! My faithful ol’ dollar store. Let me show you how it all started.
I’ve been wanting to make a wire basket for some time and while I knew I was going to make it from chicken wire and wire hangers, I just wasn’t sure how I was going to make the frame.
I was originally going to cut and glue together wooden dowels, but then I spotted this…
Not exactly French country, but remember how I often write about thinking outside the box? Well in this case, let’s look outside the basket. Notice the frame?

I started by cutting the straps, only to feel guilty as I imagined someone having used their own hands to make this basket (which is well made by the way). I hate to think that these items are made by people who get taken advantage of and work so hard for pennies (way to put a damper on my excitement) :o(
So I kept the straps and will think of some use for them. At least that way, their hard work will not ALL go to waste.

The frame had a black coating on it that didn’t say ‘I’m old’, so I used some sand paper to sand it off. I then used a wire coat hanger to make two triangles, which will be placed at either side of the frame to hold the handle. Make two little loops at the bottom as pictured.

Attach the triangle at either side of the frame and close the loop tightly with your pliers. For the handle, I was lucky enough to have had one from an old wooden lantern, but I was originally going to use a drilled dowel.

I even thought of using a carton tube from tin foil paper roll. It’s very sturdy and by painting it, you would never know it was made of cardboard. Feed another piece of wire through the handle, make two loops at either end and attach to the top of the triangles.

I then wrapped the chicken wire around the frame (sorry forgot to take pictures) but
please, please, please…if you want to avoid multiple pricks and blood, use gloves!!! While the gloves were sitting right beside me, I refused to use them as they were too big and were just getting in the way. So I took one for the team, but you don’t have to! I used my favourite paint, a mixture of green, brown and orange and with a brush gave the wire some rusty personality.
I also used a piece of wire to make a partition in the middle (not pictured in the tutorial but you can see it on some of the other pictures)
I also used a piece of wire to make a partition in the middle (not pictured in the tutorial but you can see it on some of the other pictures)

And that was that…
I’m very happy with how it turned out.


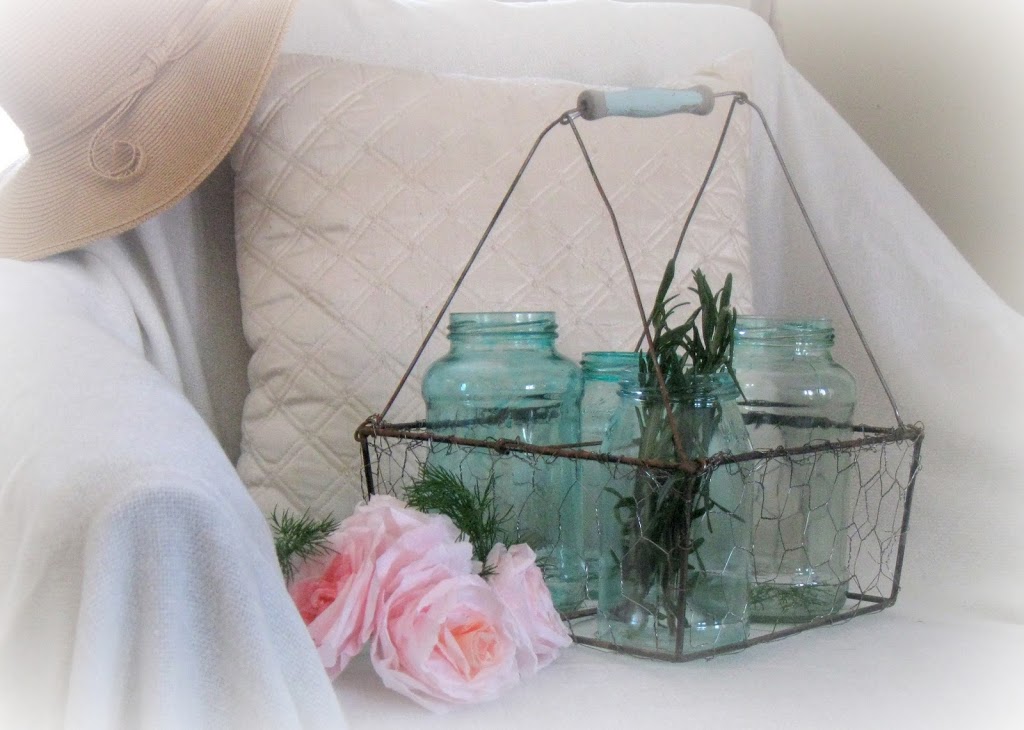

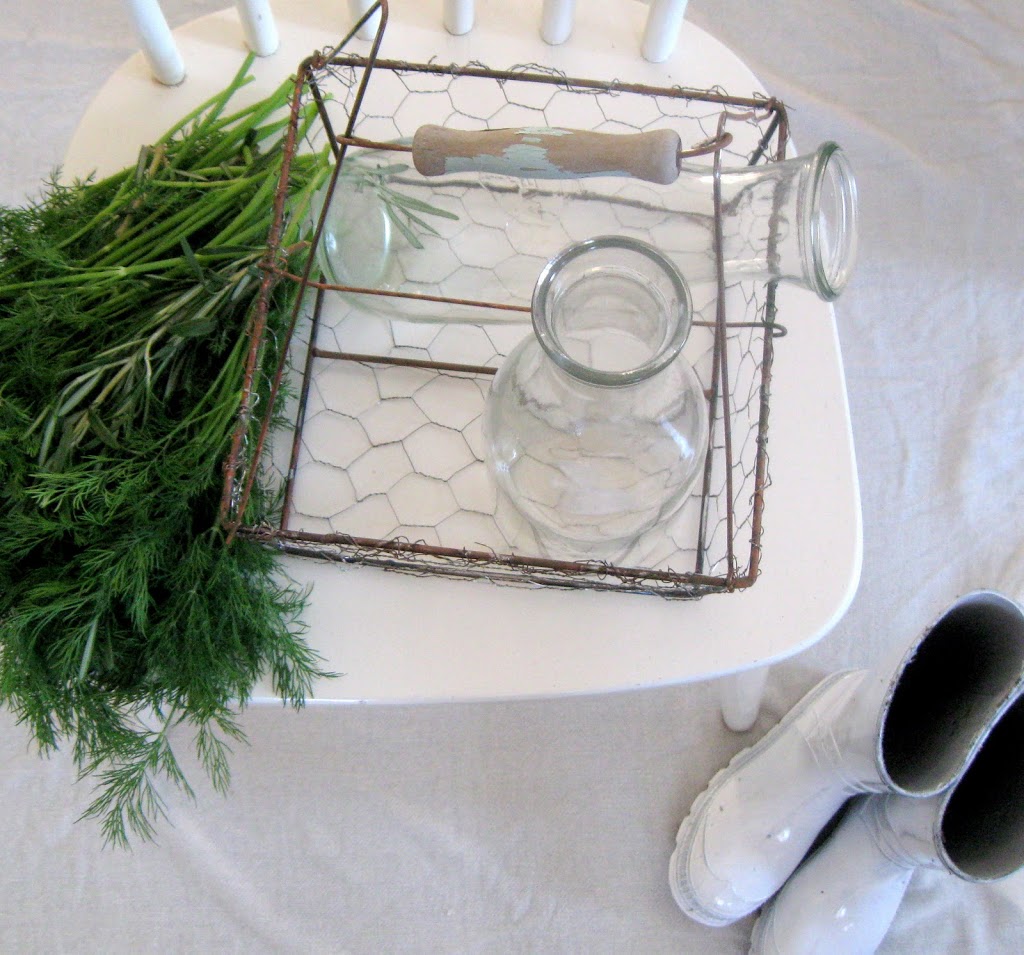

I purchased some fresh herbs from the super market and
placed them in clear jars. She will sit pretty in my kitchen.
placed them in clear jars. She will sit pretty in my kitchen.

But before then, I had to capture some photos to show her off a little…

Thanks again for being here, I love your company.
Wishing you a beautiful weekend!
much love,
Lucy
Basket $1.25
Chicken wire $2.00 (brand new item from the dollar store, and I used less than 1/4 of it)
Total = $3.25
I am sharing at
and
and also joining the Centsational Girl fair weather forum

So impressive! Thanks for sharing that tutorial because I would have NEVER thought of that on my own!
AHHH! I am in LOVE! I have chicken wire in my garage! I am going to try this soon (with gloves…ouch) Thanks for a great tutorial! Have a fabulous weekend!
Too clever!! I never would have guessed that it is handmade!
Love it! Very vintage looking 🙂 Way to go!
Great Job !!!! Thanks for the tutorial ….. I would love to try this soon and I will have open eyes at the dollar store !!!
beautiful!
Love this! I have been looking for a wire basket forever! I am so proud of you, Lucy! You have really taken off with this blog…I’m so enjoying this!
I’m new to your blog…first timer! But…Oh.My.Goodness. Love it! The basket is the best! Great tutorial, too!
The basket is absolutely fabulous! Love it!
Well, I missed your previous post because MyHero and I are traveling this week..but I went back and read it and left you a comment…but I am leaving it here too because I don’t want you to miss it~ And I love your basket!!!
Lucy- I just love you! You could wrap YOURSELF in thread and I would applaud and say HOORAY because it is YOU! You have such a pure and sweet spirit that just comes through in everything you do! God has blessed your children with a wonderful Mom that takes time to do special things WITH and FOR them. They won’t realize how blessed they are until they are all grown up~ Amen!!! xxoo Diana
WOW! this is super cool…and way inventive…thank you for sharing!
Oh I love this!!! I’ve been wanting to make myself a wire basket but wasn’t sure how to make the frame. Thank you for the wonderful inspiration!
amazing …I like the idea a lot…I´m sure I´ll try this out in the next time …have a creative weekend!
Love it!! How amazingly creative and inspiring!!
Chrissy
That’s fantastic! It really looks old. I’m so impressed with the paint treatment; it looks like real rust.
I can’t believe you made this basket, and no, I will never get enough of those blue jars. Brilliant idea, Lucy.
Off to the dollar store! This is fantastic!
I call that.. looking for the bones.. and you totally saw the bones in that basket.. good for you!
Maddie- The domestic anarchist
http://www.domesticanarchy.blogspot.coom
I’m visiting from FJI–I never would have guessed this wasn’t from your visit to Tuscany! The handle and faux rust really make this believable. Lovely photos, too, Miss Craftberry.
This is so cool! I am so going to do this! I saw this on FJI and it caught my eye. Now I have to go to the dollar store to make one! Thanks for the awesome tutorial! Love the photography! Just Beautiful!
This is what I need to do! I can find any wire baskets here without spending a bunch. I had no idea the dollar store had chicken wire. I didn’t want that huge roll from Lowes! Looks great with your blue jars. I love my my jars 🙂
I love the idea, it really looks antique!!!I’ll definitely try this one of these days. Bravo for your mise en scene, so pretty.
thank you for sharing
have a nice week end, sun in France hope the same for you
Oh my gosh this is such a cute idea!! Thank you so much for the tutorial. I think I better make my way to the dollar store today.
This is my first visit to your blog. I am so glad Donna at Funky Junk Interiors featured you on her Facebook post.
Have a great weekend!
Pam
What a transformation! Love the simple elegance of the wire basket and the blue jars are just perfect. Quite lovely.
Oh my I am in love with this! And it just so happens I’m headed to the dollar store today! I would love to have you join my VIP party today and share this. It’s INCREDIBLE. http://designergarden.blogspot.com/2011/03/vip-party-8.html
oooh….yippee! I think I might have one of those baskets around!! thanks for the tute!!
Ok now that was brilliant! Who would have thought to take apart that basket? I’ll be thinking out of the box next time I go to the dollar store!
Thanks
Susan
That turned out great, you’d never know it came from the dollar store!
Hi! I love how you think outside the box! This basket is the perfect example. That’s the reason why I like your blog – you’re not like everyone else. Keep up the great work!
SO AWESOME!!!!!!!
m ^..^
O.K., girl….you just out did yourself…That was so creative!…The Dollar Store is going to have to start paying you!!!
Lucy- this is insanely fantastic!!! Absolutely LOVE it! You are so creative and it came out so charming-thanks for sharing this at FNF! 🙂
Well aren’t you just a genius!!!??? Seriously, I would have NEVER thought of using those baskets! I see them all the time at the thrift stores, I may have to try this myself!!
Tania
Voting started tonight! Remember, you are one of finalists for Best of March 2011 at Saturday Mornings! Congrats again, there were over 700 entries! Here is the link to the voting area, and be sure to grab your button on the right sidebar at the very bottom to display here and drive your readers to vote! Good luck!
http://www.thesaturdaymorningsblog.com/2011/03/voting-for-best-of-march-2011-here.html
Super Duper cute, I don’t even wanna touch this one, its a one of a kind! Beautiful!
OMJealous. Thats all there is to say about that. Thanks for linking up!
Love your guts
mandi
Never would have know that it wasnt old, well done! Laura
Wow, so creative and so beautiful. Looks so old and elegant.
Cheers,
Tracy All Thumbs Crafts
So pretty and functional. Love that you made this out of something else. Love your photos. This is such a clever project….thanks for sharing!
Oh I love jars and baskets! Great blog, I’m a new follower!
Jo-Anna
excellent idea and very pretty.
megan
craftycpa.blogspot.com
Wow! Very cool and creative idea. It looks great. And, I love the blue glass jars in it. Thank you for sharing this.
xo,
Sena
I LOVE IT! I have been looking for one of these at flea markets, junk stores, garage sales – everywhere! Now, I’m makin’ my own!! Great job and GREAT tutorial!!
Lucy (AKA 3rdpigkid)
http://www.pigbrainatwork.blog.com
I love this! Great job!
I love old wire baskets. This is a very creative way to make one! thanks for sharing over at Sundae Scoop!
jen
Scissors & Spatulas
I just love this basket. And your tutorial. It really is ingenious! I’ve seen new ones (that look too new) and old ones (that are way to expensive), but this one is perfect.
Thank you for this!..Great tutorial..wonderful pictures!
p.s sometimes i just leave stuff out in the rain to rust!
Wow what a great idea and turned out beautiful on your table
I am in awe of your talents, my friend. That is amazingly beautiful. I LOVE the handle! I love everything about it. You truly are gifted!!!! Now, if you make another and need someone to sale it to, you just let me know.
BTW….I GOT MY GIFTCARD! Thank you so very much. I am so excited to use it. I will let you know what I get for myself. Such a treat.
Sorry I haven’t checked your lovely blog in awhile. I have been so busy opening up my Etsy shop. I have several beautiful aqua blue jars in my shop. I have tons in my house. I love them and their great color.
Take care and God bless, Amy
Gorgeous! I never would have thought to use that dollar store basket this way! Very creative, it looks like an old antique!
This basket is genious! I’m in love with it! It would make such an awesome gift basket too!!!
Thx for sharing your talent!
So pretty! I can’t believe you didn’t find that basket in an antique store. Great job. I am a new follower too.
this is awesome….and i had no idea that the dollar store sold chicken wire… 🙂 the basket turned out great….
hugs, cindy
Thanks so much for the tutorial! That is such a brilliant idea. Love that it looks so rustic and kinda vintage. Also love your jars, very lovely.
BRILLIANT! I would never have looked at that basket and thought I could make your version. You have quite a vision!
so good, I’m inviting you to come link it up with us at the DIY CRAFT TUTORIAL LINKY PARTY over on our site; http://www.finecraftguild.com/diy-craft-tutorials-party-32/
we’d love to share your project with others on on our site!
OH how I love this! I love that you thought of using that basket in that way! and the patina looks great. Very creative!! That part about where you got it in the South of France made me laugh!
What a terrific looking basket! You are most creative with your thoughts and your hands. 😉
Are you going to offer these on that etsy shop of yours?????
~ Sarah
WOW!! That is impressive!!! I can’t believe you MADE that! 🙂
You clever, clever girl! I love it. It looks vintage. I would have never guessed.
Visiting you from My Romantic Home, So cute & creative! love this – xoox, Tracie
goodness, you are talented!!! just gorgeous!!!
Are you kidding me!!
You are so amazing with this!
Great job!!!
Brilliant!! Well done!
Oh, this is just brilliant! I’ve just recently started following your blog and I have so many things I want to try making. I must make the blue jars, and now the basket too! I’ve been saving up the little Starbucks coffee jars (mocha beverage) for a grouping so I’m ready to go! Thank you for such inspiration.
Splendid idea, I love it! Thanks so much for linking up to Beyond The Picket Fence.
I just love this and might just try to make my own.
Because of all the great ideas I see on your site I’m giving you the Versatile Blogger award. You can find my post here:
http://havestampswillcraft.blogspot.com/2011/04/me-versatile-blogger.html
Adorable. Creative. Genius.
I am having a spring craft linky party and giveaway on my blog this Friday. I would love for you to showcase this wonderful project.
Details are on my blog today.
I loved this so much I had to make some for myself.. not as easy as it looks, but I had a great time making them, thanks for the ideal.
Teresa
http://www.squarenailsdesign.blogspot.com
Outstanding! Way to think outside the basket.
This is darling. I am highlighting this at somedaycrafts.blogspot.com. You have great photography skills1
I love this it is so cute! I have one of those baskets so I am super excited my lotions and sprays are going to have to go somewhere else lol
I love that! It really looks authentic. I may have to visit the dollar store now. . .
Jenni@houseofwhiteinteriors.blogspot.com
Hi Lucy, I found your blog from My Romantic Home & I’m happy to say I’m a new follower. I LOVE your milk basket. I will be on the look out for a basket I could transform into a basket. What a great idea. Thank you : )
Have a wonderful weekend
~ Deanna
Great project, I love how it turned out!
OMG!!! Loooove this project! There’s something about wire baskets and jars that captivates me! 🙂 Great job!!!!
This. is. brilliant!
(Visiting from The Shabby Chic Cottage.)
Lucy! You are so brilliant! What a great idea, girl! Thank you for sharing it! It’s beautiful – I love it – and now I want to make one! 🙂
xoxo laurie
Thank you so much—-this is brilliant! Have you linked to Miss Mustard Seed? She would love this! {I am a little blog addicted}. I plan to try this out. Many blessings to you for sharing your talent. Audrey
Excellent idea! Why didn’t I think of that? Very clever and cute. Will be great for autumn, and for Christmas/Winter holidays. Good for you. My name is Loo.
I love this. Great idea.
Well I am just going to die!!!! I love that basket! What a clever idea…and I will be trying it! Thanks, Vicki
So beau•ti•ful! Thanks for sharing ALL your wonderful ideas! :::Bookmarking:::!
I like everyone else on here have fell in love with your colorful brain Mrs. Lucy. This is a fabulous tutorial and just what my sister in law is looking for, so I think I shal be making one or two.
Ashley Smith
This is great-Can’t wait to try it! Also, loved the pic of your “boo-boo”, I always take a pic of mine, too, just to remember all the blood, sweat and tears I’ve put into a project!
OMGoodness! This is my 1st visit, and I am so in love…lol! I have wanted one of these forever, along with the blue mason jars. Who knew I’d find both DIYs all in one place! MANY thanks!!
Teri :o)
This is so great, you have such awesome creative ideas! What green, orange, & brown paint colors did you use? I have a birdcage that needs a little rust… 😉
Thanks for the tutorial. Your basket turned out so fabulous!
Wow are you inventive. I am so impressed. Think I might have some kind of basket like that to use the frame from. I am a nut for wire baskets and those jars of which I have several of the antique old blue ones and slightly bigger jars that have a greenish color.
I’m very protective of my jars, have hauled them around all over the country. Out of about 2 dozen jars only one clear one got broken, bummer.
I can hardly wait to make that wire basket, it just makes me so darned happy to be able to have access to your awesome projects and talent.
wow. now I have seen everything. you just looked at the ‘frame’ shape and went with it.
thanks for showing us how.
blessings
barb
i made one that looks a bit like yours, it turned out beautifully, i wraped the chicken wire all the way around the frame so nothing stuck out, it looks like something id buy in a store 🙂 youre such an inspiration 🙂
I love this and your post about the milk bottles. Looking forward to exploring the rest of your blog. Thanks for the details directions and your beautiful ideas!