I hope you all had a great weekend and if you’re a mommy, I hope you had a wonderful Mother’s Day.
I had a beautiful day as my kiddies had made me feel loved and so very special with little homemade gifts they had worked so hard to make.

The most beautiful part of it all was at the end of the day when the kiddies sat me down on the couch and then ‘performed’ a song they had written. My Bella sang while Tristan played the piano, to the best of his abilities.

The words to the song – although simple – made me cry tears of joy because they get it. They get what family and loving one another means and that is priceless…

I will share the words to the song and some pictures of their creations in a later post…so beautiful…sigh!

In the mean time, I want to show you the latest craftberry. Isn’t it fresh?

I love succulents and have been wanting to make a little terrarium…

But I wanted something different, and so I went to work…
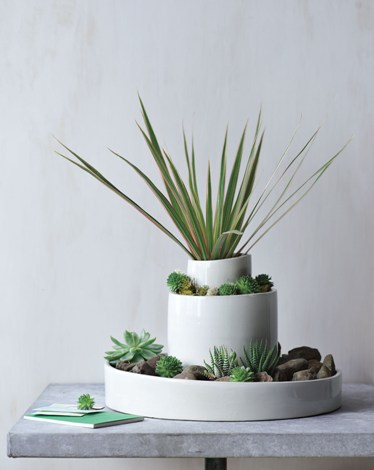
I was inspired by this West Elm planter. I couldn’t find a direct link to it (sorry), but I had saved the picture on my computer.

A couple of months ago, I was honoured by being ‘crowned’ the DIY monthly winner (you can find the winning project here). One of the prizes was a box full of Gorilla glue products.
Oh my! The possibilities. For this particular project, I used the Gorilla Epoxy.

I glued clear glasses in between dollar store ceramic bowls. I decided not to spray paint the glasses because I knew they would not be visible once the plants were in. I used different size bowls with an opening wide enough to insert plants.

Succulents are drought resistant and prefer drier soil. In order to draw moist away from the soil, you need to place a layer of gravel or pumice rock at the bottom of the container. I added a layer of sand on top of the gravel (although I’m not sure if this was necessary) and then a layer of potting soil.
As I am not an expert on this topic, you can find some more information here

I also bought a small bag of river rocks at the dollar store to place on top as decoration. The moss I picked up from my yard.

Arrange the plants as desired, cover roots with potting soil and add some embellishments, such as rocks or pieces of driftwood.

Once you are happy with your arrangement, gently brush away any soil that might have gotten caught in between the leafs of the succulent.

The entire project cost under $8.00…not too bad huh?
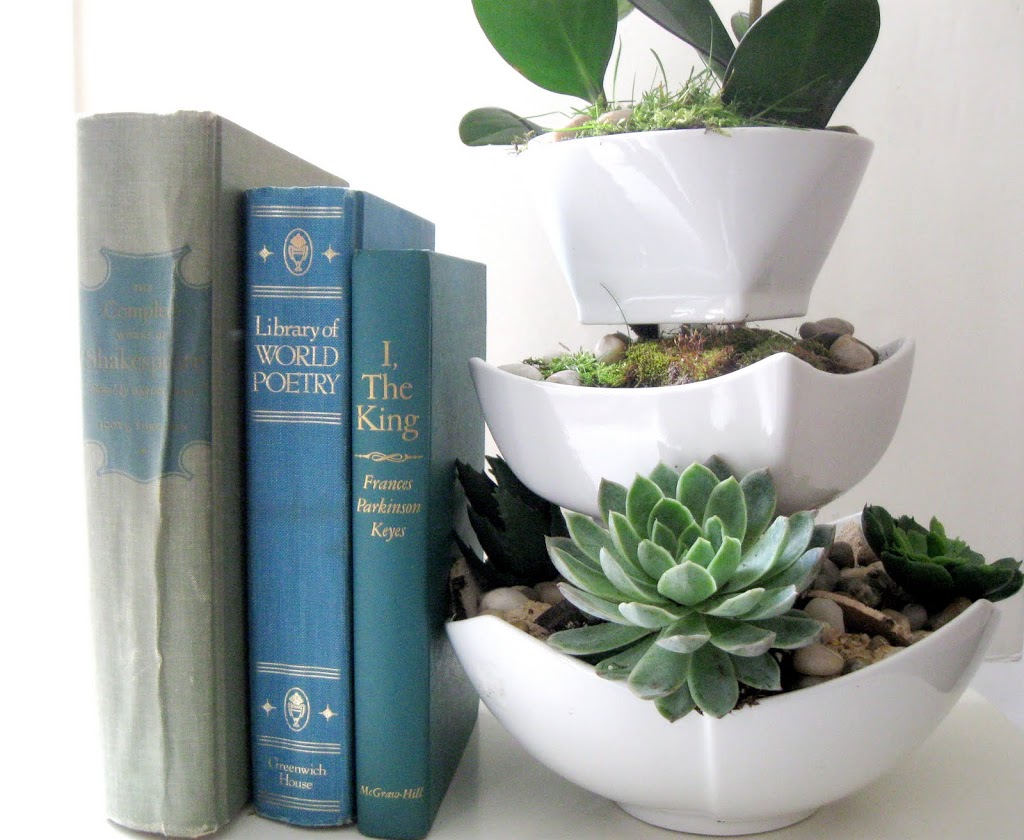
And here is an extra tip: if you look at the succulent on the right, you will notice that it is not a real one. I purchased an artificial one at the dollar store. It came in a tiny little terracotta pot and I just pulled it out and ‘planted’ it in its roomier home.
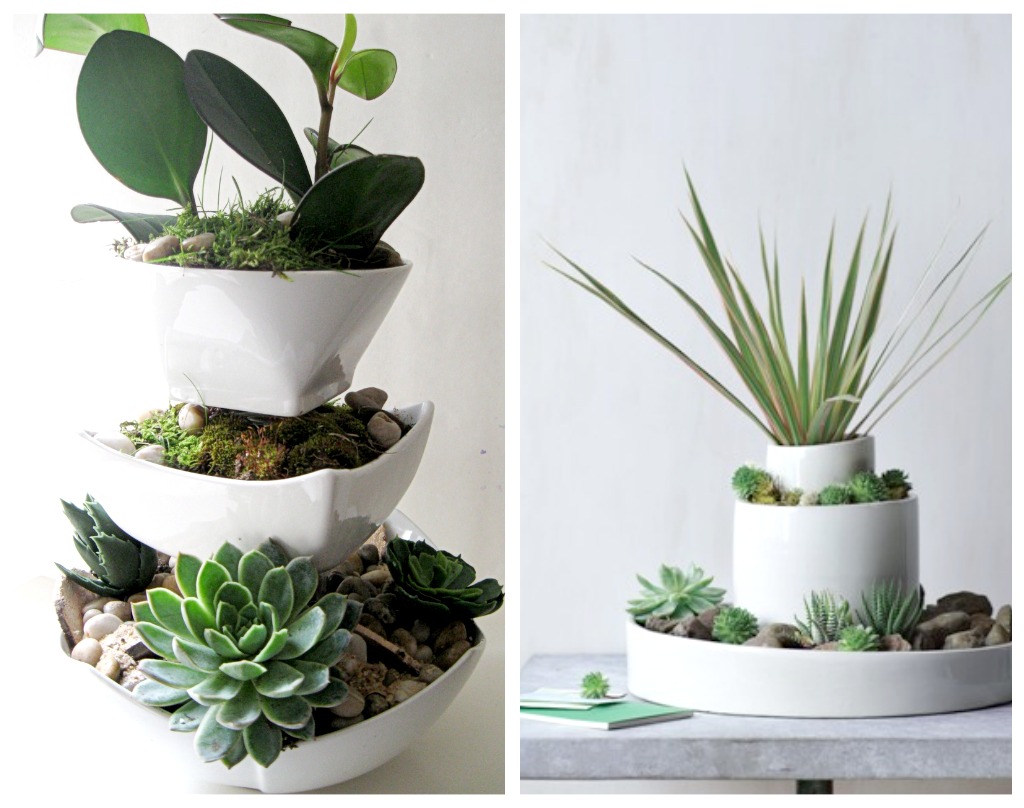
Here are the two versions, side by side….

She is so pretty sitting next to those gorgeous books, which I was lucky enough to find at our local second hand store. They are not very old per se, but I loved the color and I can’t stop reading those beautiful poems. The green one is a compilation of all of Shakespeare’s books.
Another week is yet again upon us, the days are getting warmer, the trees outside our window are looking greener and the Craftberry Bush is blooming with creativity.
I look forward to sharing some of it’s blooms with you. Thank you for cultivating with me.
Much love,
Lucy
participating in


I love succulents, and the planter you created for yours is so beautiful!
I appreciate the informative read. It was quite enlightening. For anyone interested in Gpop – more details here, I suggest checking out the offerings from the Gvibe brand. They cater to both women and men.
Great job! I love the crispness of the white with the plants.
‘hugs from afar’
LOVE love love.. Funny I was just outside planting my succlents and pick some moss from the woods..
Love your planter, Lucy. I just planted a giant pot of hens and chicks this weekend. I think I may need to add some moss now.
Love your planter and all the photos!
Lucy, this is great! I like your piece better than the inspiration piece. ~ Sarah
Lucy- I love that planter you put together! It is wonderful. I have never grown succulents-I guess I always think of them as being deser plants! AND they look great next to those books!
I will look forward to reading the song the kids performed for you- They “get it” because you are their Mom and YOU “get it”. xxoo Diana
That turned out so good Lucy. I like yours better than the one from West Elm.
It sounds like you had a wonderful Mother’s Day with some very special children 🙂
hugs ♥ tricia
Beautiful and fresh!
LOVE this planter and the succulents you’ve got in there! The tastefully shot photographs add to the beauty of this post. Found yours through craftomaniac, glad I did 🙂
How pretty! I Love this idea
So creative, great book find, too!
Blessings,
Catherine
So pretty and fresh! Looks so much better than the West Elm version.
I love yours better. So pretty.
This looks great. I think it’s better than the West Elm on too. You’re very talented.
Love yours better than West Elm too! And whatevs! No way is this project wompwompwomp! You rocked this one! 🙂 I love me some succulents in any way, shape or form!
Thanks for the follow, and right back atcha!
Thank you for following my blog Lucy; I’m honoured 🙂 I love reading your blog, your creations are adorable and you take such great photos! x
The Dollar Tree?
Oh, thank God for that store!
No, I couldn’t tell that the succulent was fake!
I have a collection of vintage white ironstone planters, wonder what messes I can make today?
Thank you for the inspiration!!
Hugs and blessings to you and your home!
~me
That turned out so good Lucy. I like yours better than the one from West Elm.
Oh my! Very beautiful……I think I may need to borrow your idea for my screened in porch! Love your photography, too;)!
Beth
Great work! I love the gentle curves of the bowls you chose. I bet this would make a terrific thrift store project, as well.
Kristina
Sweetfer Handmade
That is so cute, and looks way better than the inspiration pic. I may have to make one of these, and then try to keep the plants alive even though I have a black thumb! 🙂
Also, I have a great giveaway going on for some chalkboard labels and would love if you entered! http://eyespydiy.blogspot.com/2011/05/chalkboard-label-giveaway-from-ginger.html
These are so great! I just bought suculents and did a post about them! I have plans to plant them in the garden this weekend, but I might just have to save a few and do this idea for inside! So gorgeous! Thanks for sharing!
super cute. I am so excited to make one for my office and my husband’s office. Both of us moved to new offices this month and I think this will be a great additon to our new workspaces. Thanks for sharing. I loved it.
acupofsparkle.blogspot.com
This is adorable. Thank you so much for sharing! I just had to pin it to bookmark it!
What a great planter!!! I would love to share this on my blog with a link back to you if that would be ok with you.
I’ve been looking for a creative way to display my succulents. Think they are finally going to get a new home! Thanks for the idea.
I like your version of the planter much better than the ‘kitchen tool holder’ look of the West Elm verson. So simple & I love the price. Thank you for sharing.
~C8>
oh this is wonderful!! i have so many succulents, i just love them!!
I just love this. And your version is much more beautiful than the inspiration piece! Have a great weekend!!
This is gorgeous! Can’t wait to make my own! ~Jen @ http://www.icantstopcrafting.blogspot.com
Great idea! I love succulents but I never have any success with them. I like that you shared how to plant because I am going to try this.
Benita
This is AWESOME!! LOVE LOVE LOVE IT! Thanks for sharing 🙂
Wow. That is so creative! I would love to try this!
Stephanie
aka luluscottage.blogspot.com (I have a pretty giveaway)
brilliant my dear! thanks so much for partying with whipperberry!!
kisses
absolutely brilliant. I’m reblogging on tumblr so you know that means it’s going round and round and round. cheers and be sure to come see me too.
L.O.V.E. I want one!
Oh I LOVE it! I thought maybe you drilled holes and used a dowel..that’s how I did my tipsy pots…
LOVE the glue…I’m gonna have to try that! I pinned it and now I’m gonna share on FB….
New follower too:-)
totally gorgeous! LOVE this!!! I’m definitely doing this soon. 🙂 New follower!
I MADE it! Thank you for the inspiration. I posted the pictures on my blog. Check out the link to se my version of it. My husband really liked it..
http://acupofsparkle.blogspot.com/2011/05/handmade-modern-succulent-planter.html
Your version is much prettier!
I am your newest follower! Love this idea! Might be making one of these. 🙂 Thanks for sharing.
http://domesticcharm.blogspot.com
Your 3-tiered succulent planter is beautiful! And thank you for sharing the how-to.
This is beautiful! I think yours looks so much better than your inspiration! 😉 I so want to do some kind of succulent home now!
I love this! I’ve been seeing it floating over the blogosphere and my first thought is, “I’ve seen that on Craftberry!” You’re famous! 🙂
Lucy, that is absolutely gorgeous, and so clever! Sharing this on FB, what a fantastic project !!!
Great tutorial, my will like it very much. thanks for sharing
Изысканно и очень профессионально. Очень понравилось.
Your succulent planter is lovely, thanks for sharing your tutorial! I have this linked to my planters post as well today, nice job!
I love this!! I just came to visit from seeing your blog on Inspire Me Heather. Aren’t succulents beautiful? It’s the only plant in my house right now. Great blog BTW.
Love this planter!! So easy and cheap, I will have to try this! I’ve pinned this for reference, and will be following you now!!
Debbie 🙂
this is beautiful!!!
Liiiindo! Parabens! Obrigada pela dica.
Sonia Maria Leite, Sao Paulo – Brasil
Leite Atelie- (face book)
Kisses!
Your blog is so refreshing,
http://www.youthinkimreckless.blogspot.co.uk
Wow this post give truly quality information . Really very useful tips are provided here . thank you so much http://www.race8mile.org/
Hi Lucy
Thank you for sharing you lovely ideas.
Do you have a tutorial on the watercolor Easter Eggs. Would love to learn how you make the beautiful
butterfly eggs.
Thank you.
Regards
Love this planter!! So easy and cheap, I will have to try this! I’ve pinned this for reference, and will be following you now!!
So where’s the best place to buy Succulents in Singapore? I don’t know, but I think we at Succulent Succulents would be a strong contender for that title.
Nice Article
Thanks for Sharing this information…
Thank you for this amazing post, it’s a very informative post for us, I appreciate what you did, I have value for you and respect your opinion. Really I like it. Once again I wanted to take the time to thank you.
https://buzzfeed99.com/cute-january-2020-calendar/
There are no words that can express my thanks to you. If words could be hugs I would send you pages. Thank you for this amazing post. We must find time to stop and thank the people who make a difference in our lives. Once Again Thank You So Much!
This is so nice, i’m going to follow you after reading this one.
Thank you for your unique post. It is very helpful in my daily life. Really I like this post.
https://scpnews.com/may-2020-calendar-printable/
Thank you very march for this post. This information is very useful to me. I hope this type of post again in the future.
https://betechss.com/may-2020-calendar-with-holidays/
what a lovely succulent
– Nice article thanks this post share
super lemon haze
I want more.
thanks for sharing
Check the Yahoo answers for the latest updates on web
Watch cartoon for free on Watch Cartoon Online official website.
Great ideas love love love!
This is the best blog so far
Thank you for your unique post. It is very helpful in my daily life. Really I like this post. https://www.starburkexotics.com
Good read, I will share this on.
How creative! So cute.
What a lovely idea!
neat. someone trying to sound so much smarter than they are.
I am extremely satisfied with with contents found on this site
The article is very nice, thank you for sharing it! I’m not fully through yet (it is extremely long) Buy Weed but it seems well researched and detailed.
Mcafee Login account is necessary for activating your product subscription. If you already have an activation code, go to the McAfee login page and sign in to your account first. Then, redeem your activation key to activate your McAfee product. Without logging into your McAfee account, you cannot get access to tour subscribed product. Hence, always remember your McAfee login details.
McAfee Login is a very simple process. Every McAfee user needs to follow it to access his or her McAfee account. If you own a McAfee product like McAfee Total Protection, McAfee Safe Connect VPN, McAfee Mobile Security, etc., you’ll need to follow the McAfee Login procedure daily. If you’re facing problems logging in to your McAfee account, please contact the McAfee helpdesk.
123.hp.com/setup helps you set up your HP printer for the first time. You can learn to download and install drivers and software on your HP printer via HP’s official website. Also, you can find setup guides for all HP printers on this site for free. Moreover, if you’re facing any error on your HP printer, 123.hp.com/setup has troubleshooting guides for you.
McAfee is an all-in-one security solution for all digital devices. McAfee provides the firewall to keep your personal network safe from hackers’ evil eyes. The in-built password manager stores all your login details safely and boosts the level of protection for PC. It provides identity theft protection, secures files, and keeps kids safe from harmful sites with the Parental Controls feature. To keep your device safe and secure from harmful threats, you can head over to https://activatev1.co.uk/ now.
McAfee offers protection from all threats that may affect the data and device. The password manager has advanced protection capabilities to keep your login credentials safe and secure. McAfee’s VPN hides the genuine IP address and keeps your identity hidden from hackers. If you want to protect your device against all threats and keep your valuable data secure from ransomware, malware, and viruses, you can install the McAfee antivirus program by downloading the same from mcafee.com/activate now.
Thank you for being the reason I smile
https://printdailycalendar.com/cute-september-2022-calendar/
Legit Arms shows you everything related to this world to help you decide on the one that best suits your taste and needs.
Please feel free to visit our website https://www.legitarmsdealer.com/
Welcome to smartpuppiesspot Yorkie smartpuppiesspot , small Yorkie breeder located in central South Carolina Our Yorkies are home raised, AKC registered and have a health guarantee.
The global Alexa ranking of their site is 54,109 and it was calculated in January 2022. Mayur K ji earns through Adsense on his blog Fire Hindi
Good read, I will share this on.
While the west Elm is nice I much prefer the planter you made. It has better lines and flows(?). I’m gonna have to try it, although I have a coal-black thumb so it will have to be faux succulents (I also have 2 cats that like to pull plants and flowers apart).
I’m not that much of an internet reader to be honest but your sites is really nice, keep it up!I’ll go ahead and bookmark your site to come back later on.
reptiles for sale
Thank you for being the reason I smile.
https://printdailycalendar.com/october-2022-calendar-template/
Black Capuchin Monkey for sale
Thank you for sharing and nice articles you have here Buy Fluffy Shih Tzu Puppies Online moreover the admin of this site has really worked hard for all this once more thanks for sharing your articles.
I am Palker Smith. I read your all blogs very informative. I am working as a Developer at Cricut Printer Company. Cricut is a user-friendly cutting machine that has an easy setup. It has Design Space software that lets you create a design of your choice and cut it on your favorite material. You can cut leather, fabric, cardstock, etc.
Visit- https://setupdesignmachine.com
Cricut Design Space is an essential app to use for various Cricut machines. You can download the app just by clicking here. With the help of this software, Cricut users can create stunning designs for projects. The app can be used on both Windows and Mac devices. Plus, the Cricut Design Space is also available for Android and iOS smartphones. Keep reading the whole content to get extensive info about the app.
Nice post, your post so nice and very informative. Waiting for your another!
CIBC Login
Nice post, your post so nice and very informative. Buy, sell, trade, exchange, withdraw, deposit, send or receive cryptocurrencies with Pro.coinbase.com
Great post!
Cash App Login
Hey lucy, you succurecently are really amazing, i have some too, but recently they started faaling due to bad care. So then i focused on gir gaay which is actually a lot fun
As Liverpool`s populace to keeps to increase, production desires to select out up the tempo so that you can make sure that the city’s housing desires may be met. And at the same time as deliver keeps to lag at the back of demand, costs appearance set to hold rising.
In Canada, the cannabis market is fragmented and confusing. Different provinces and territories have different rules about how old you need to be to buy weed, where you can buy it, and how much you can possess. As we’ve talked about, legal weed is a term used to describe cannabis West Coast Cannabis that is cultivated and sold legally under certain regulations and conditions………
Uniliv is a premier provider of premium PG accommodation in Delhi, India.
pg in delhi university
The Silhouette Cameo 4 is a cutting machine that works with your computer or mobile device (Windows, PC, Android, or Mac). It’s about the same size as a home printer. It also includes software that enables you to make anything. These designs can be cut out afterward on vinyl, fabric, paper, or heat transfer material. The machine is incredibly adaptable, allowing it to produce complicated projects of any scale, from little to enormous. The Cameo and the Portrait are two separate cutting machines offered by Silhouette.
Cricut™ makes smart cutting machines that work with an easy-to-use app to help you design and personalize almost anything.
install cricut design space app
creamy chocolate infused with the purest mushroom extracts, shaped into a bar of polka-dotted perfection
https://mypolkadotchocolate.com/
The DIY succulent terrarium is genius—gorgeous and budget-friendly.
Thank you for sharing such a delightful and creative craft idea!
https://shannonreptileshomes.com/
Shannon reptiles homes. We are a family-owned business operated out of Florida and have been operating in the U.S. for the past 9 years. Each year has been spent providing exclusive animals and unbeatable service to our customers. We sell live animals, supplies, and feeders. Our
Reptiles are a diverse group of cold-blooded vertebrates that belong to the class Reptilia. This class includes snakes, lizards, turtles, alligators, and crocodiles, among others. They are characterized by their scaly skin, which is made of keratin, helping them conserve water and thrive in various environments, ranging from deserts to lush forests. Reptiles are ectothermic, meaning their body temperature is regulated by the external environment, a trait that influences their behavior and habitat choices. Their adaptability to a wide range of ecological niches has allowed reptiles to thrive in most terrestrial environments on Earth.