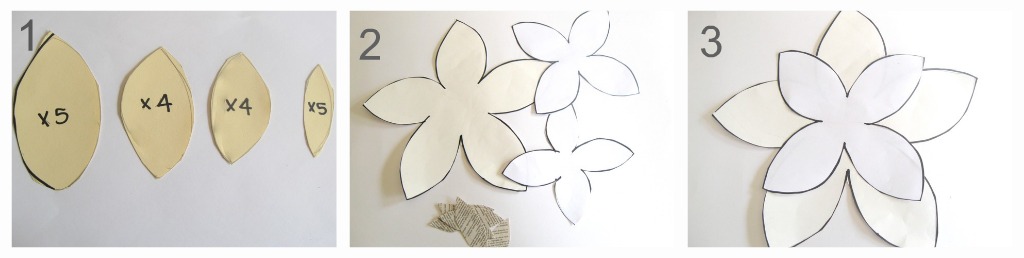

4. Place largest cut out first
5. Glue second cut out on top in the position shown on figure No. 5.
6. Glue the rest of the cut outs as shown on figure No.6 (placement is important).

7. Fold all petals upwards towards the middle except the bottom (largest) petals
8. With a curling iron (yes…I said curling iron) curl the petals in towards the centre (I don’t know if this is normally done by paper artists, but If they don’t, I recommend they do).
9. Curl some petals inwards and some outwards

10. Turn flower upside down and cut along dotted line towards the centre as shown.
11. Turn flower right side up and curl petals.
12. It should look like figure No 12.

16. Scrunch up a small piece of paper and glue to the centre of flower. As an alternative to this, I used a painted Styrofoam egg cut in half. The shape mimics the stamen of a Magnolia. If you wish, go here to see it.
17. I painted the stamen black so you can see it better.
18. Flower is now complete.


http://www.houseofhepworths.com/

Wow! This is beautiful!:)
Sanghamitra.
http://rainbow-thecoloursofindia.blogspot.com
Hi Lucy! Thanks a lot for this tutorial…your magnolias are really cute!!!
I like your blog very much and I have added it to my favourite ones. If you want to have a look at my blog (I have had it for few months…here it is… http://my-littleinspirations.blogspot.com
Emanuela
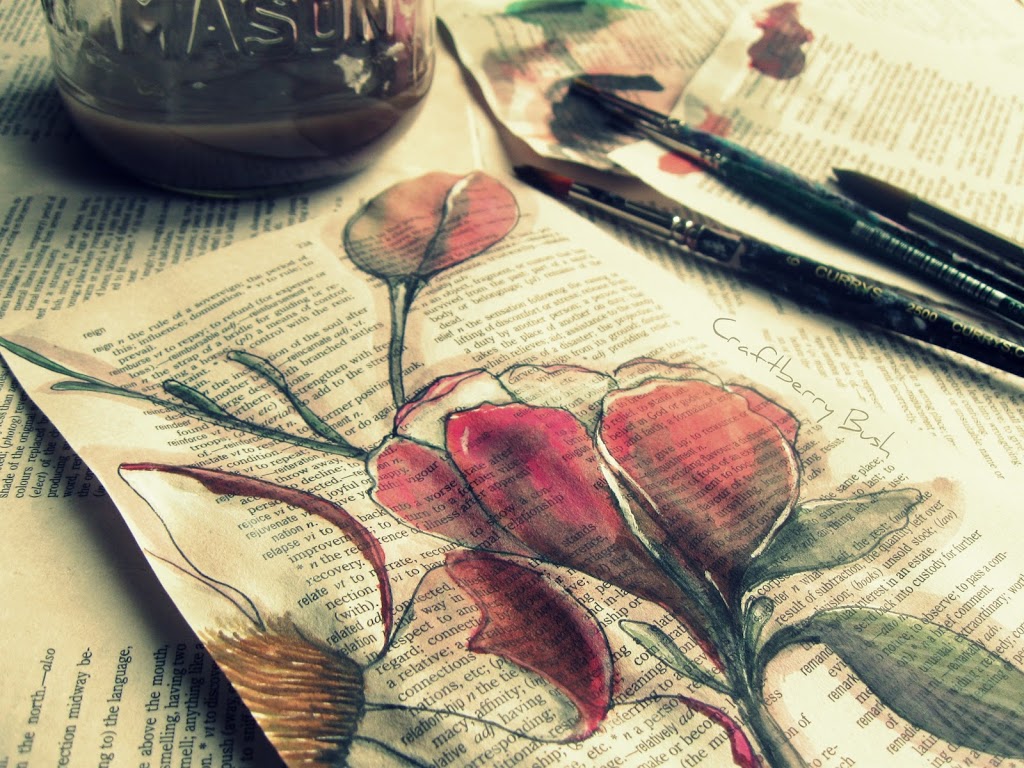
I love your book page painting.
Katie
http://www.katiescreative.blogpot.com
Girl, I bout fell out of my chair when I saw the curling iron! lol…..I use a flat iron! lol Great minds think alike….Great flower tut!!!! and really…….the curling iron is a FAB idea!!!
Thanks so much for sharing, they are beautiful!
Wow! I love the flower painting on the page and the paper flower tutorial. I never thought of using a curling iron! I would say that you are definitely a paper artist 🙂
Lucy- Did I tell you that you are AMAZING? WOW- Love it. When I lived in FL I had a beautiful magnolia tree in my front yard…the smell was heavenly! Thanks for this tutorial…and the painting on the book page? Way beyond the talent most of us possess!!! It is gorgeous! xxoo Diana
These are fantastic! You are so talented, my friend!
I love what you do and the spirit you give to everything, so poetical. I am impatient to see your books, I hope you will share them very soon.
A très bientôt
So fun! I love them. And the painted book pages are gorgeous. Yes, please share more of your book pages.
wow very cool, thanks for sharing 🙂 just found your blog and it’s lovely
What a happy springtime tutorial!
wow, i love them! it looks so fun! thanks for sharing the tutorial, i just might try it!! Have a great weekend!
Love it! they look so elegant!
I just made one – so fun! I don’t happen to have a curling iron (I know), so I just rolled the ends around a pencil. I’ve done it before for bulletin board displays for preschool when I am making 3D grass. Works like a charm!
Your magnolias are just so sweet and pretty! Love them and what a great idea to use your curling iron~ very creative! Thanks for sharing at FNF! 🙂
Well Lucy I’m a fan. Magnolias are one of my favorite flowers; do they grow up your way in Canada; they’ll be in full bloom in May here in Louisiana and I’m gonna take a bunch of pictures, but thanks to your tutorial I can have them year around and I took a look at your wreath and love the wall collage you arranged. Terri http://www.morningdewdrops.typepad.com
Thank you for the tutorial! Lovely, lovely blog! I’m a new follower!
Jo-Anna
Thats lovely. Id like to make that one! Fiona
That painting is so lovely! I love painting on book pages – adds so much texture. Frame them!
How beautiful! The tutorial is great. Love it!
I’m having a jewelry giveaway right now, if you’d like to join! http://www.alittleknickknack.com
beatiful!
i’m a great fan of paper art and this sure qualifies as EXCELLENT
WELL DONE.
you’ve inspired me/us (Ishowed it to my fried)
How Beautiful!Hire PHP Programmers
Is the curling iron on? (ie. hot?) or is it just the shape pressing against the paper.
chris
Hi Chris…the iron is on…:) xo
Wow Nice! What a Art! 🙂
Software Development Company
If somebody wants expert take on the main topic of blogging next I advise him/her to go to this site, continue the fussy job.
click here
painters woodbridge vaThank you so much for such a great blog.
I think I have never seen such blogs ever before that has complete things with all details which I want. So kindly update this ever for us.
click over here now
It’s amazing in support of me to truly have a blog site, which will be valuable meant for my knowledge. Thanks admin. more info
Your blogs are easily accessible and quite enlightening so keep doing the amazing work guys. Jap Byg
I suppose I’ve selected an unbelievable and interesting blog. Bignold Painting
stukadoor-nederlandYour blogs are easily accessible and quite enlightening so keep doing the amazing work guys.
The blog is good enough I again n again read this. Steel doors
I really enjoy reading and also appreciate your work. http://www.gvlha.com
I’m glad to locate so much of informative data in your blog. Water Damage Pros
For a long time me & my friend were searching for informative blogs, but now I am on the right place guys, you have made a room in my hea best rated refrigerators
I was searching about this issue as you have discussed very clearly and lovely manner that I don’t have to go now any other webpage. water damage restoration nj
thats what i look for
Great Post
php developer india
It’s really a great post..I would like to appreciate your work and I am going to recommend it to my friends. Thanks for sharing.
Very informative post,thank you for sharing post with us.Awesome Blog.
Awesome blog! Really I like to do paper art craft work and appreciate your work.
Awesome art with amazing creativity. Very helpful for those who love creativity.
Piękny wpis, generalnie masz racje, chociaż w kilku kwestiach bym się kłóciła.
Na pewno Twój blog może liczyć na uznanie.
Jestem pewna, że tu jeszcze wpadnę.
Thanks for doing such an authentic information.
very nicely done and explained… nice creativity
Nice Article. its really very helpful. Keep Posting.
Very well written Article. Nice Work.
Nice tutorial to make beautiful flowers.
I read that Post and got it fine and informative.
Great Content loved reading your blog looking forward for more such blogs!! As an additional information you can check out our website for Cabinet Painter Spartanburg
Thanks for shring this informative article. Explora nuestra moderna colección de Sudadera, perfectas para uso casual. Alta calidad, cómodo y a la moda. ¡Compra ahora!
If you have planned an international trip to Europe or France, you may be wondering about the best way to stay connected without any network issues. You can buy Europe eSIM online for your travel. It gives you seamless connectivity across all European countries. Shop today from the official website of Holiday eSIM and get an additional 10% off on your order.
Sonic menu provides information on all kinds of items, including their prices, calories, hours, deals, and ordering guide
very good article you’ve written.
Thanks for sharing informative article on creativity.