
These jars take their name from John Landis Mason.
Mason was a young inventor who came up with the concept of a metal screw-on lid in 1858. The threaded neck on glass jars that we take for granted today was once a major innovation. Mason’s developments made preserving food at home much easier and made the jars reusable. Despite the fact that Mason sold five of his glass canning jar patents in 1859, his name had staying power. The mason jar is the common name for glass home canning jars to this day (source).
As promised, here is the jar tutorial some of you had requested. I do however have to share some good news and bad news about this particular DIY. Would you like the good news or the bad news first?
In the spirit of optimism let’s start with the good news…
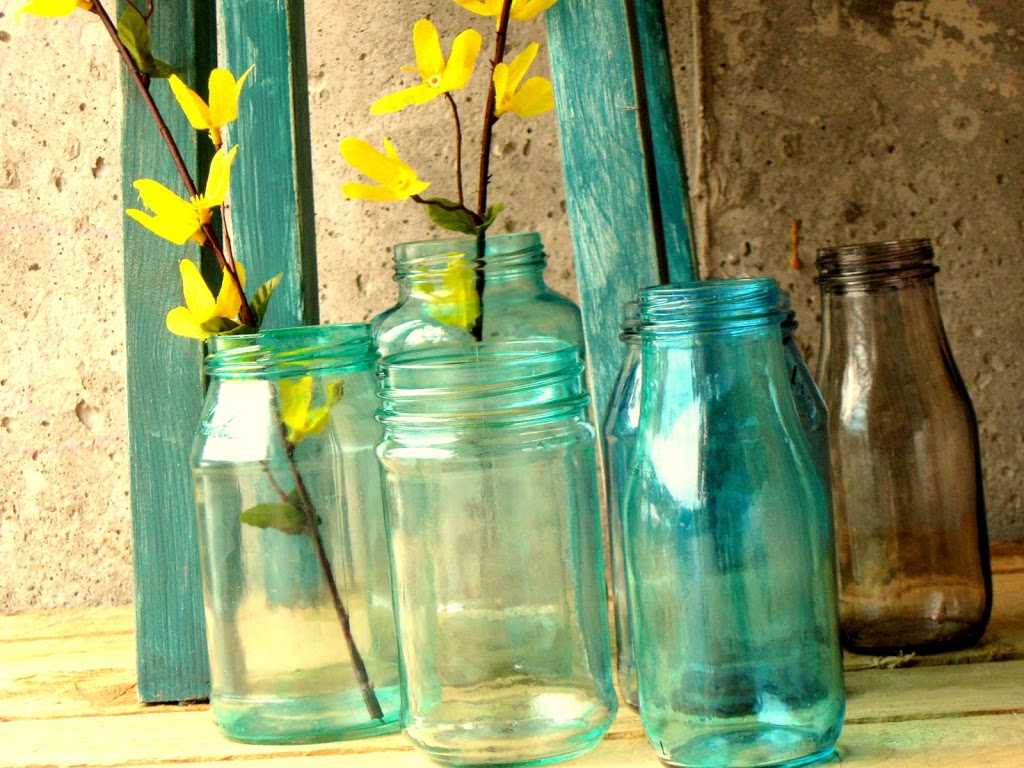
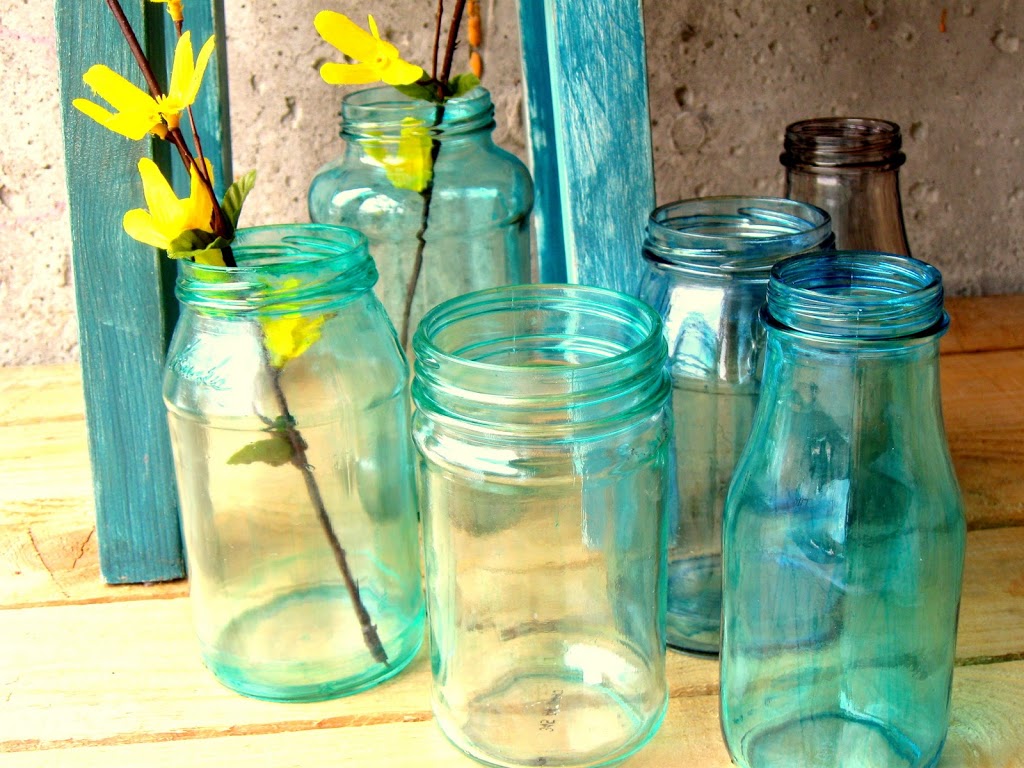
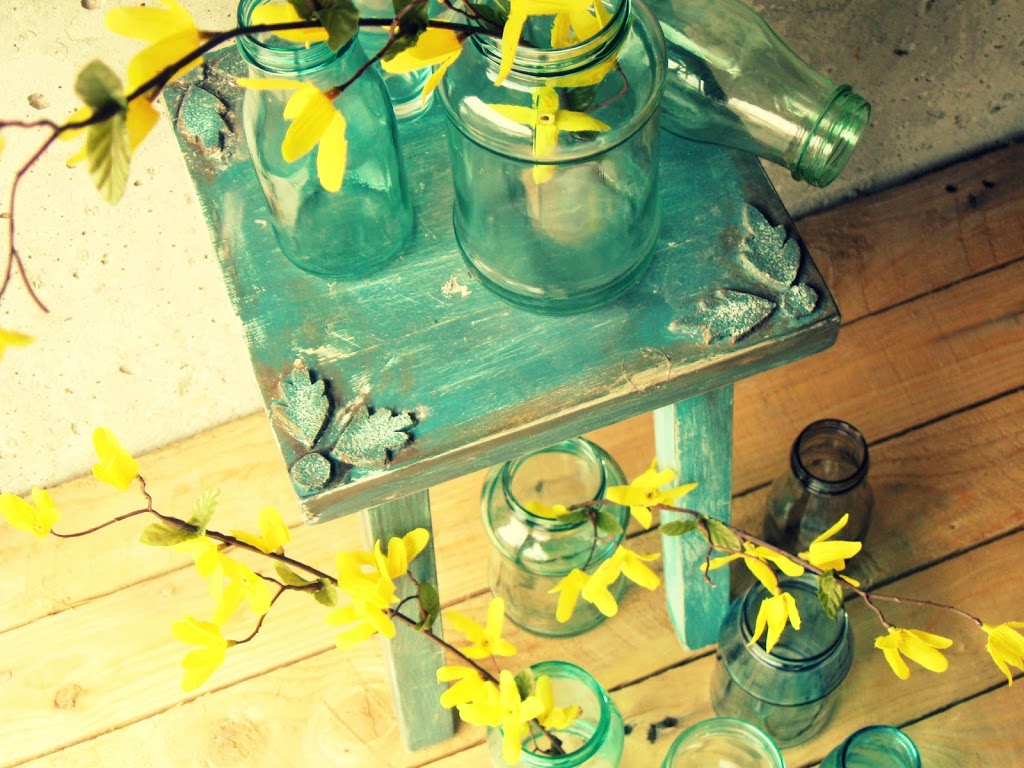
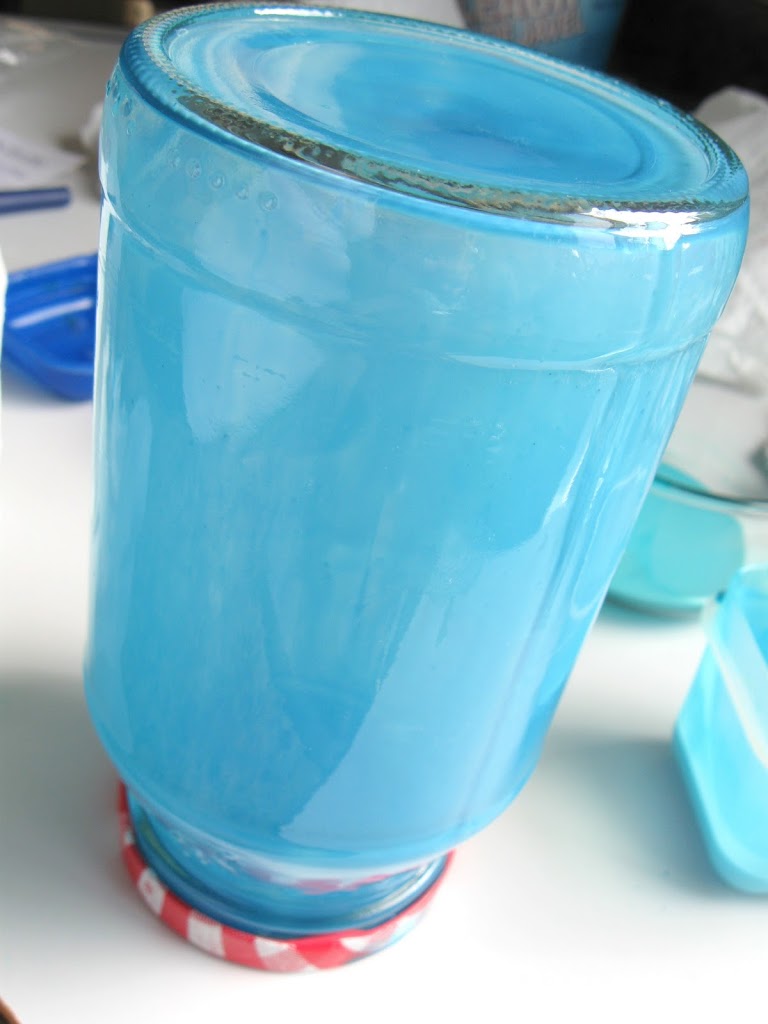
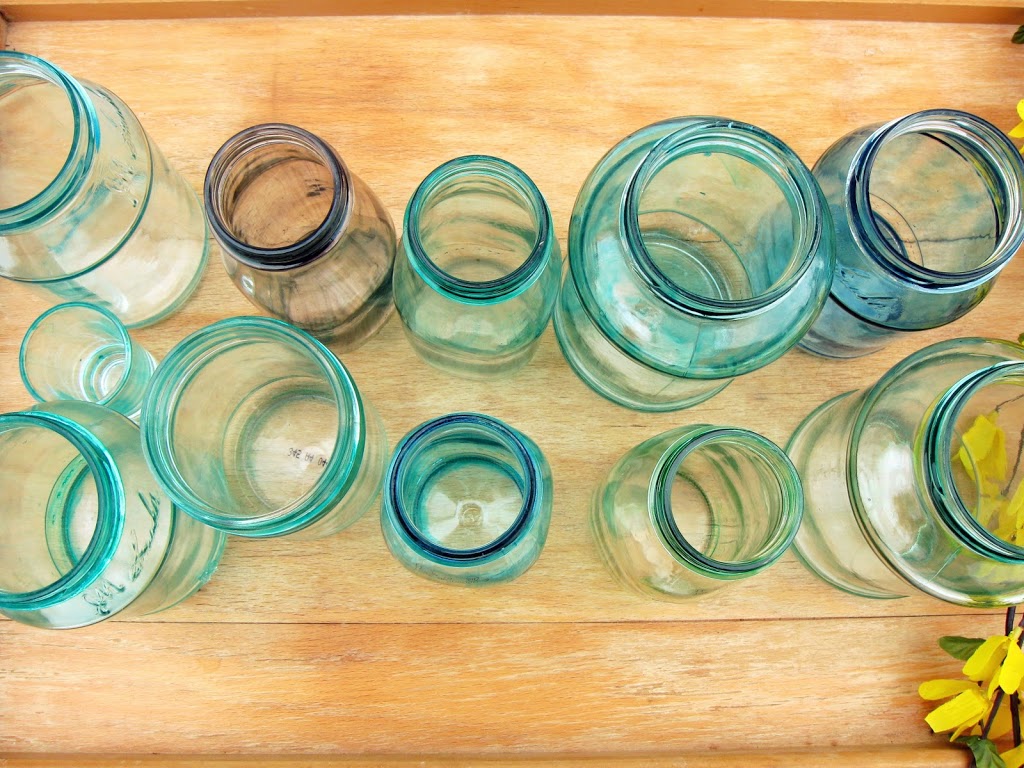
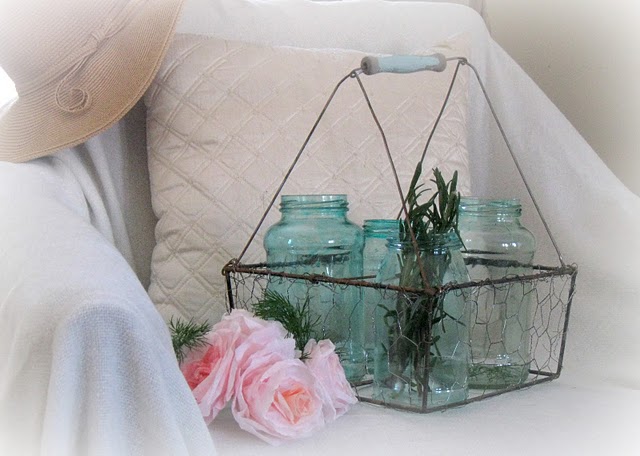
The jars, in my humble yet clearly biased opinion, turned out pretty fantastic. Take a look…
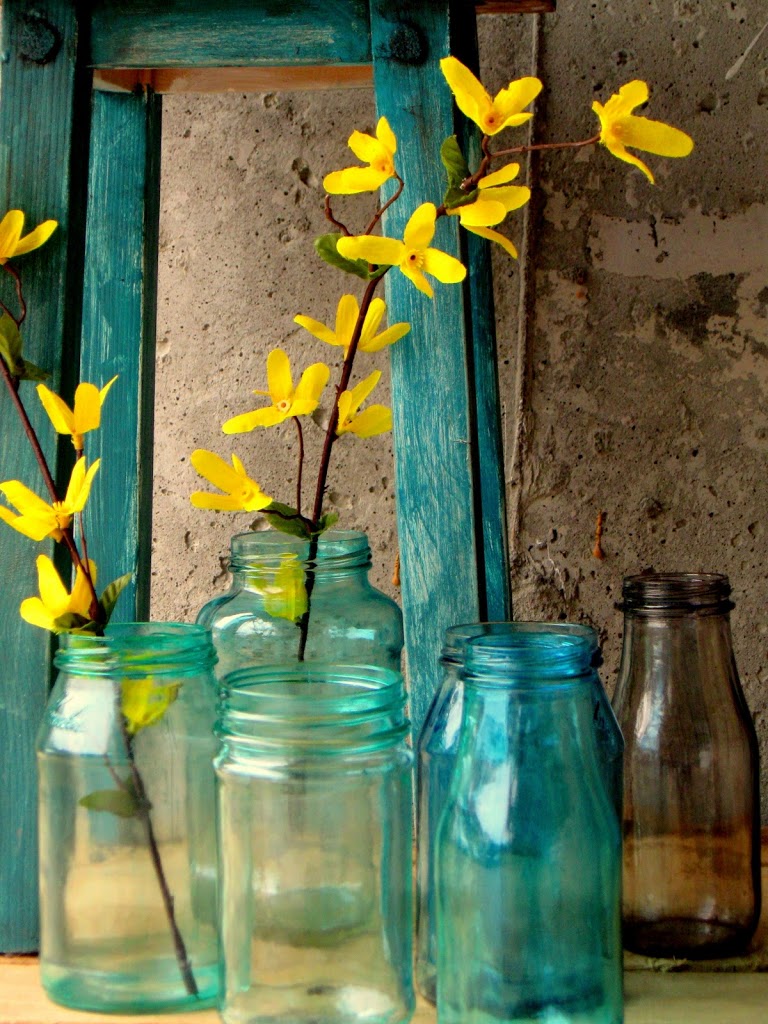

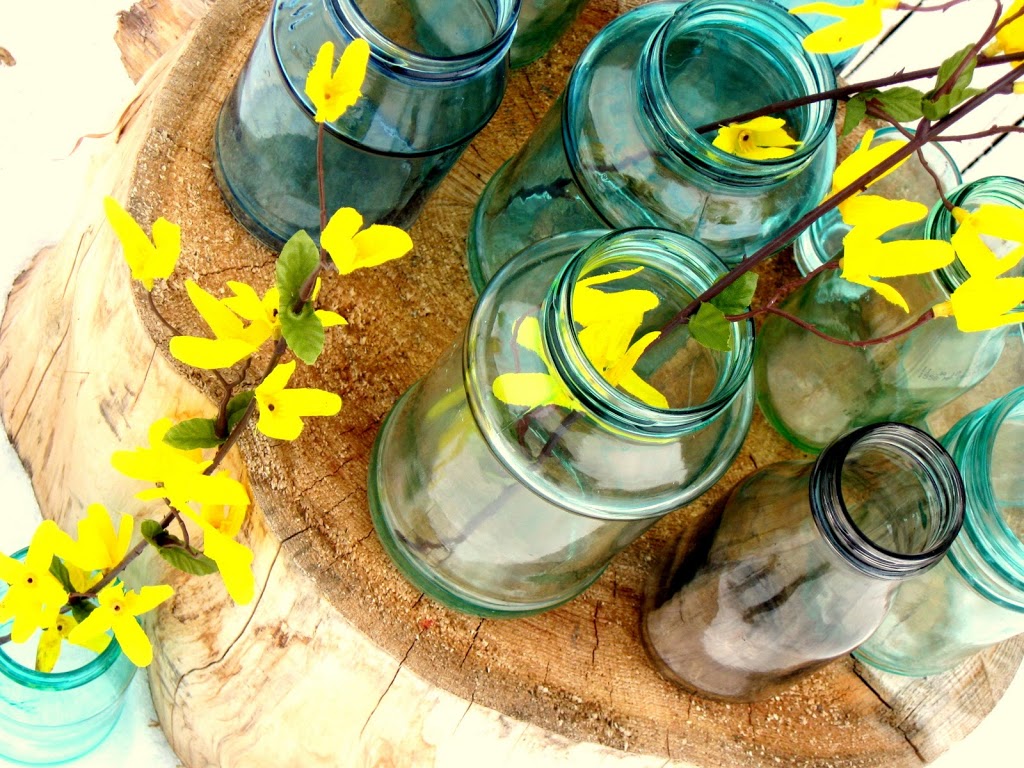
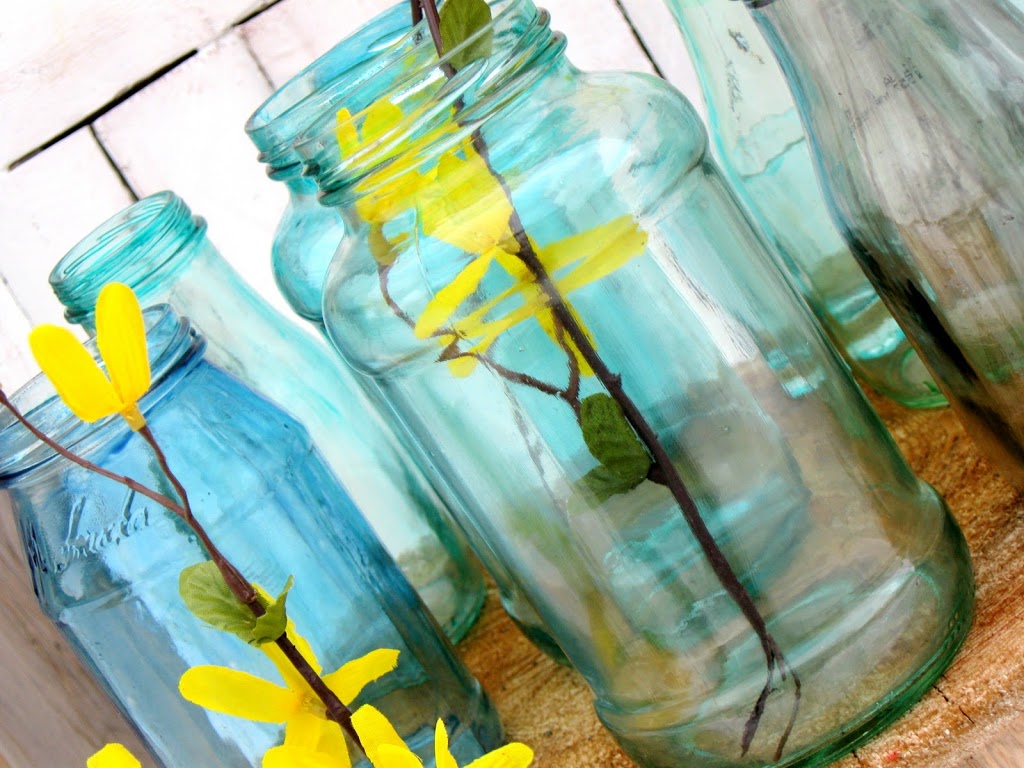
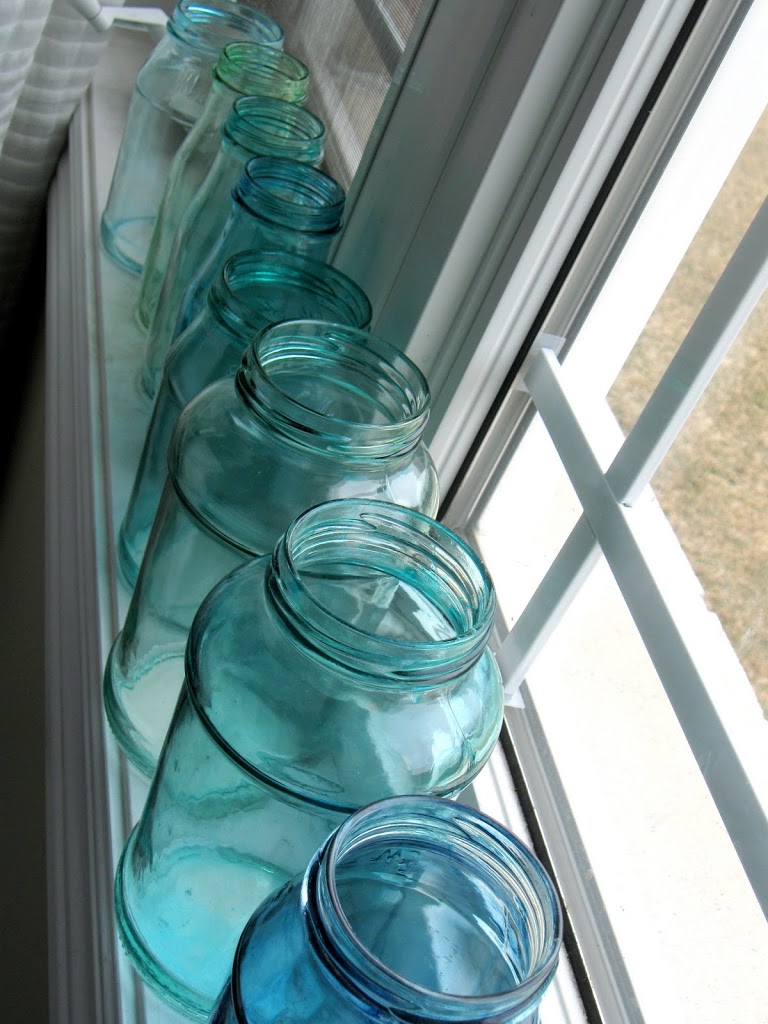
Take a look at the darker bottle on the right. It’s a hint to the bad news of this post, but before I break the bad news, let’s get to the tutorial…
Paint Brush
Patience
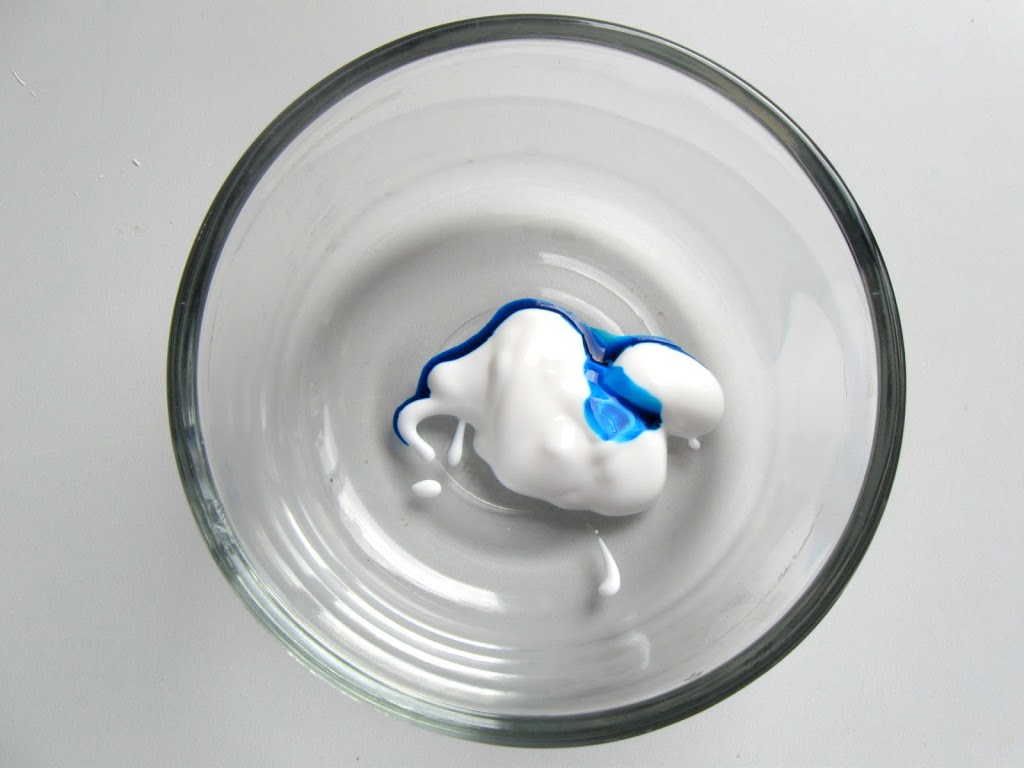 |
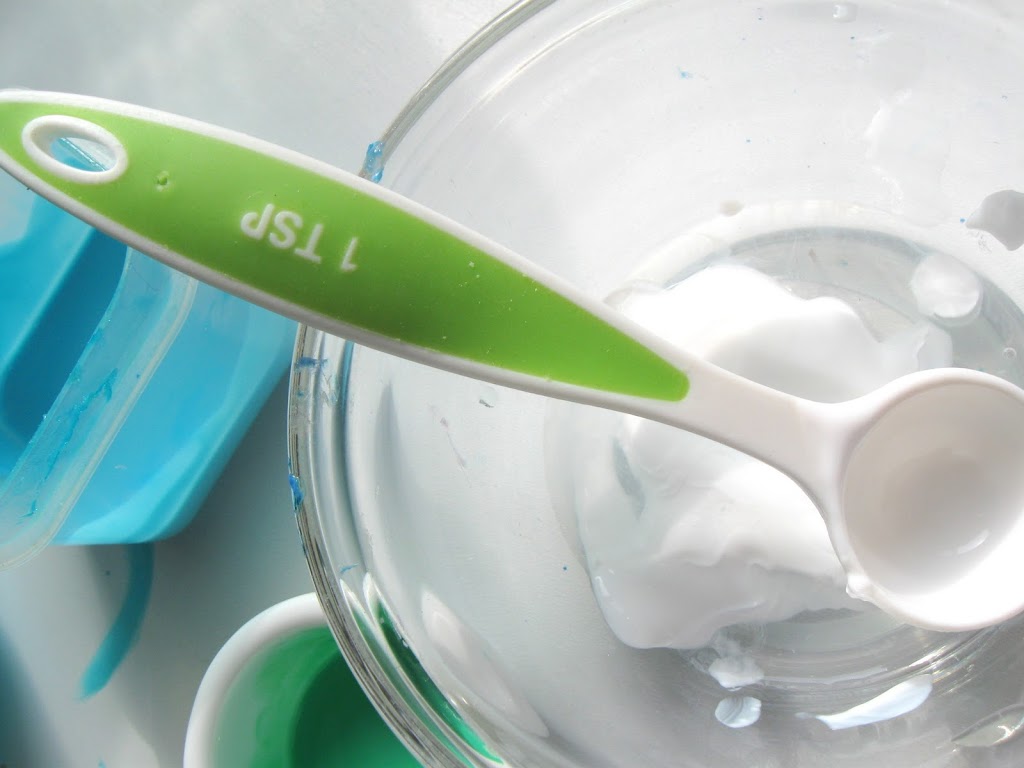
| In a small bowl, place the glue, food colouring and water |
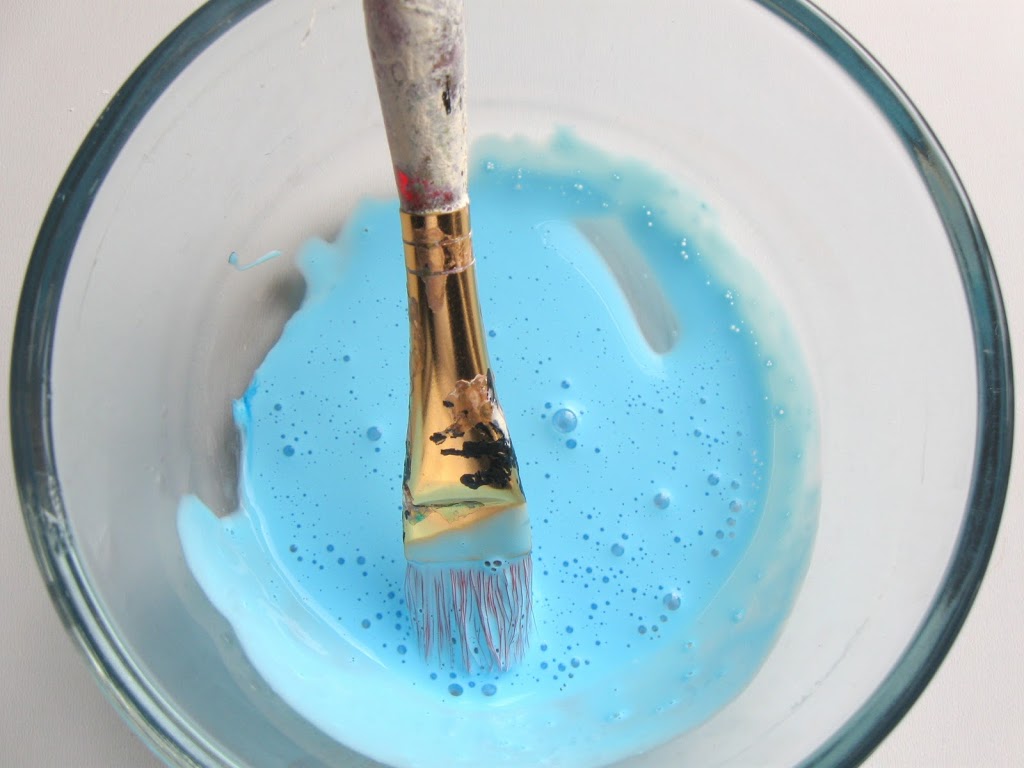
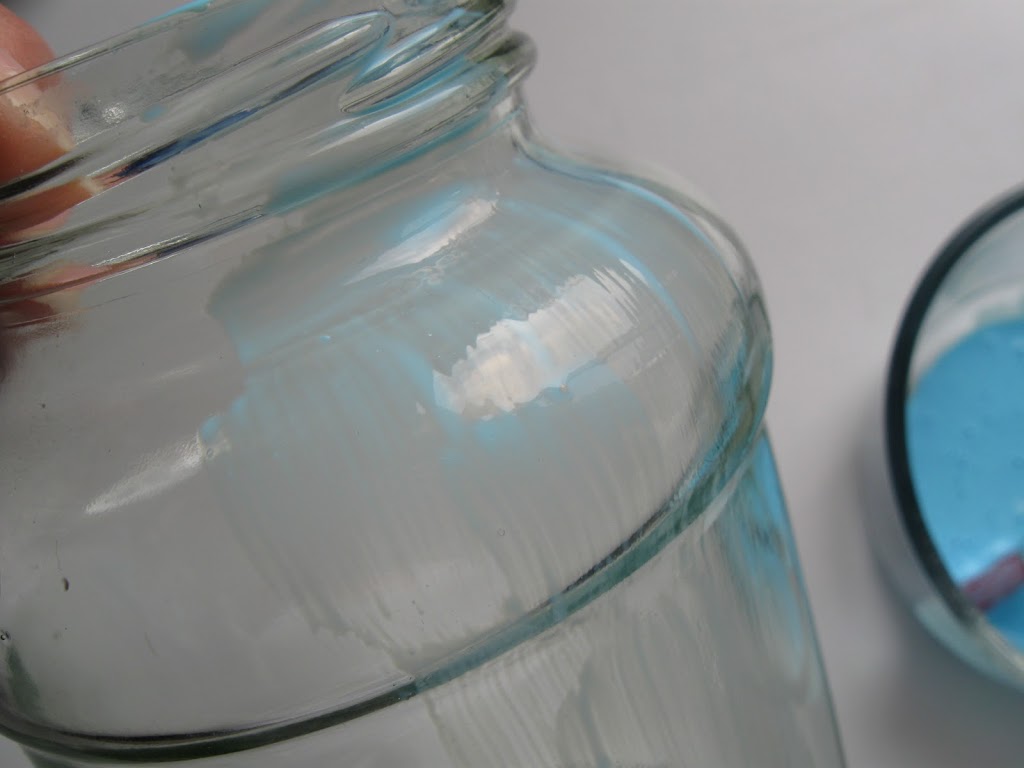
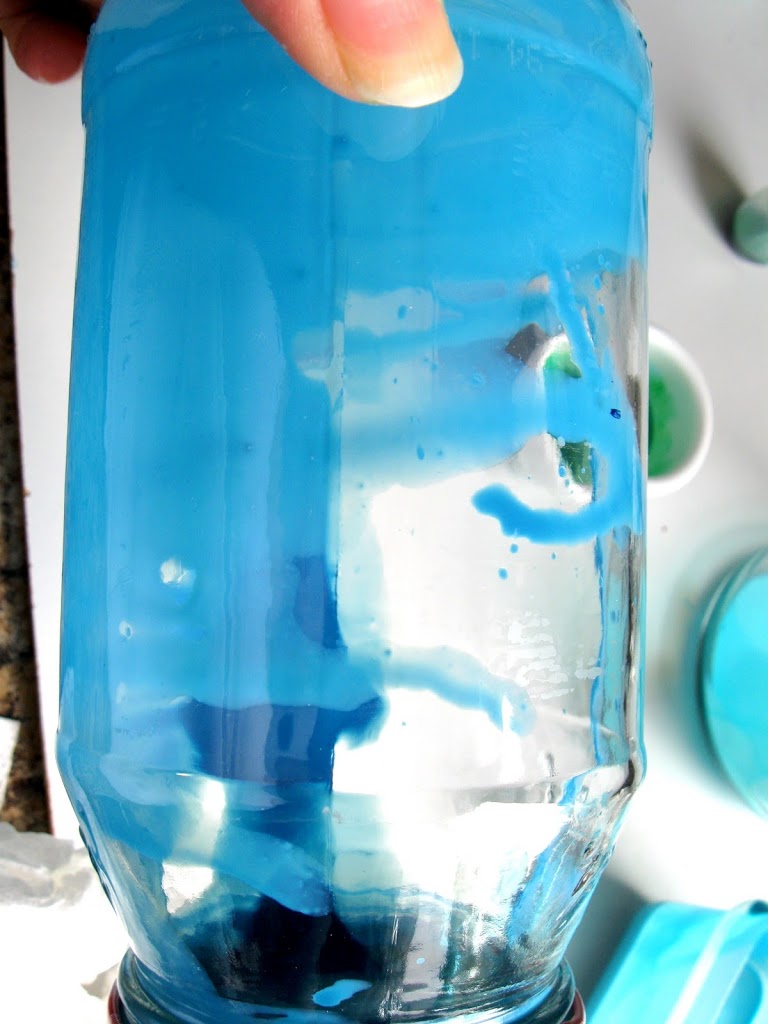
Using even strokes, brush onto jar from top to bottom and being careful not to go over it too much or the glue will start to clump together (this part is a little frustrating until you get the hang of it). The streaks you see when the mixture is wet will be almost invisible if done correctly. This is where patience comes in.
The bottle dries in minutes but during my experiment, I placed it in the microwave for 30 seconds on low to expedite the drying time. I added an extra coat to the neck of the jar and at the bottom of the jar. If you look at a real vintage jar, the accumulation of colour seems to be at these two spots.
Turn the jar upside down and allow the residual mixture to drip onto the lid or paper towel. Once it stops dripping, remove the lid and allow to dry. The results with this method is a little cleaner but it will take several hours to dry and some of the jars had drip marks :o(
It might take a little practice to get it just right, but here is some more good news: you can wash it off and start over.
Which brings me to the bad news: you can wash it off and start over! These jars – although pretty to look at – are not practical for every day use as the paint will peel off.

Good news: IF you decide to follow the brush method and paint the jars from the outside, there is nothing stopping you from using these jars as vases so long as the water is poured carefully inside or you can always use these or these and avoid the risk.
Bad news: If you like the darker shaded jars, well, I found that the darker the shade I used, the more visible the streaks were.
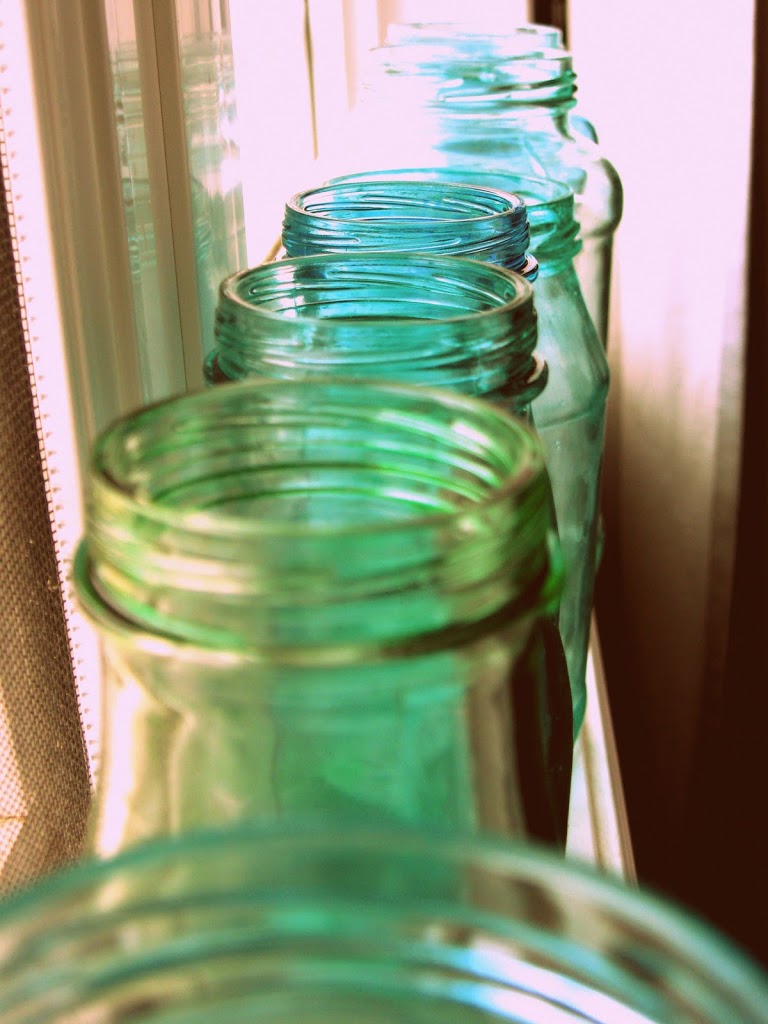
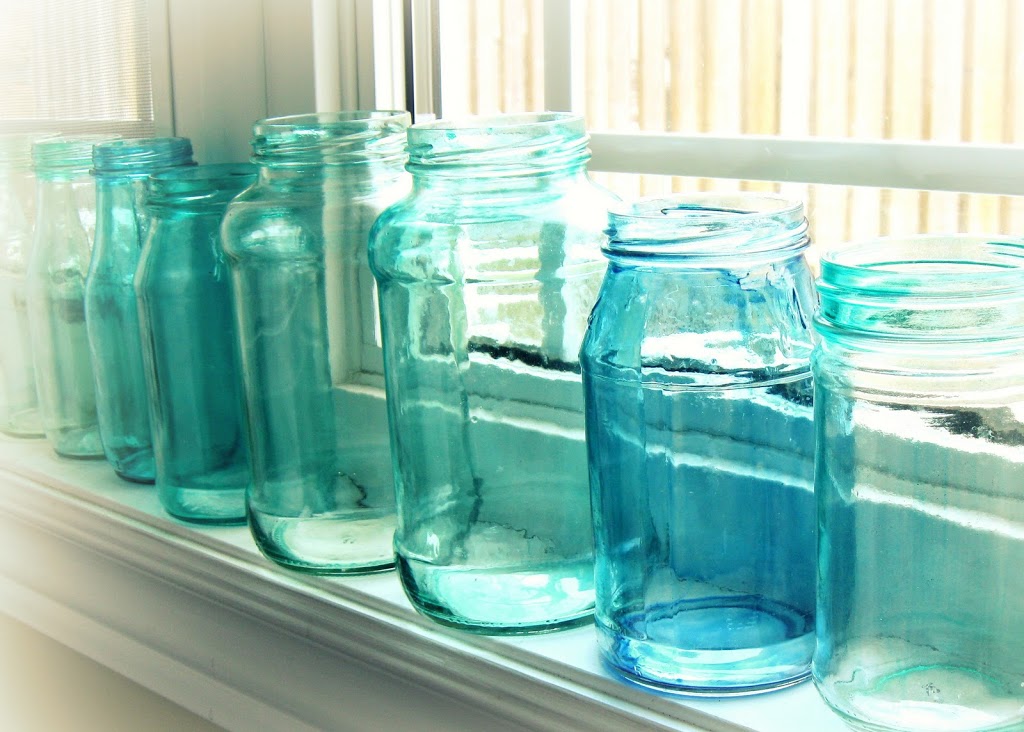
Overall I think they look pretty close to the original and by adding other elements or incorporating them into your decor you will achieve the ‘look’ for A LOT less.


Wow! Those are amazing! Did you come up with this totally on your own? Or was their an inspiration! I would never have thought to use food coloring and glue for that effect!
Shouldn’t there be some kind of award for this project?!
Everything shared is differently amazing with extremely different inspiration
sekho.com.pk
I love this idea! I found your blog at Between Naps on the Front Porch. You have such great ideas and I’m your newest follower! I’d love it if you’d follow me back: site news
Again, you did a fantastic job with this!! 🙂
Wholesale sock sales site with excellent quality and price
Site address: minelsocks
I agree however add some stone cladding to the jar will give it some pop.
Apply For Loan | Funding In As Little As 24 Hrs……….
Contact us___________
fidelitylendings (@t) gmail com…
stone cladding is a great way to decorate with mason jars.
Buy cheap plane tickets
I was thinking how lucky you were to have so many of the blue bottles.
you right body
I think these are beautiful, Lucy. I love the various shades of blue.
Lucy~ PHENOMENAL!!!! WOW! You just have a wonderful talent for “figuring things out”…These jars are beautiful. I wonder if the ones that are painted on the outside could be coated with a poly spray to “set” the color…and keep them from washing off? Hugs- Diana
I was just wondering the same thing about spraying it with a sealer so the paint wouldn’t wash off
I’m SO GLAD you posted this!! What a WONDERFUL tutorial…I do love my “vintage” mason jars, but I probably will make some more for around the house!!! I have several baby food jars..wouldn’t that be kinda cute? little ones? ha!
I need your help with a wreath…I started it last night, and it is a horrible mess….
Ohhh I love the idea of doing baby jars – maybe for a shower? so sweet! 🙂
Clean inside with rubbing alcohol will make paint /glue last longer, with no peeling, acts like a primer.
When I first saw the pic, I just assumed these were authentic, and I STILL can’t tell the difference even now that I know! This is a fantastic tutorial. I am obsessed with jars too and just cleaned and washed out a few that had sauce in them. I need to try out this method, especially since that blue color is EVERYWHERE in my house! 🙂 Thanks again!
Kelly
OK that is crazy!!!
I was thinking how lucky you were to have so many of the blue bottles. I only have a few!
What an emotional post all the ups and downs……. ha
I am so going to try this! I love blue glass!
Thanks!!!!
Yay!!! I’ve been waiting for this tutorial! Thank you thank you! I think the bad news is not so bad at all, and I can’t wait to try this for myself! Thank you for sharing this, all your ideas are so great!
You tickle me pink! and blue!!! LOL
Thank you for sharing all your ‘secrets’Lucy.
Adorei seus “vasos”, adorei o contraste das cores, o banquinho rustico, tudo lindo!
Flores cor de rosa também ficariam lindas!
Oh my gosh, I LOVE these! Blue glass has got to be one of my most favourite things in the world. I have a lovely vintage blue pedestal bowl my Grandma gave me ages ago that is always on my counter – it makes me smile every time I look at it. I love how simple this project is – thank you for the tutorial. Now to find some old jars!
I love this idea, and I must confess it’s one I would never have thought of nor have I seen it before. Thanks for clueing us in!
I think I may be a little addicted to jars too!!! They are just too cute! Thanks so much for sharing this tutorial!
These are very pretty. I’ve seen similar DIYs where people baked the jars for 20-30 min on very low heat. I wonder if that keeps the paint from coming off when you wash them?
oops, my mistake!
Your jars are beautiful!! I love the colors. I found you on Blue Cricket Designs linky party this week!
Hugs ~~ Suz
http://www.inspiringcreativeness.blogspot
I love this idea! I found your blog at Between Naps on the Front Porch. You have such great ideas and I’m your newest follower! I’d love it if you’d follow me back: http://stillwaterstory.blogspot.com/
Again, you did a fantastic job with this!! 🙂
these are fab, you can get the same effect using alcohol ink with a zero drying time and it lasts.
The jars are gorgeous! I may just have to make a couple to fill with white seashells. Thanks for sharing!
Wow! I love love love blue mason jars (a bit of an addiction to all glass bottles/jars). This is a fabulous project! I’m including a link in this week’s highlights. Thank you so much for sharing your creativity in the DIY Project Parade. 😉
Please feel free to grab an “I’m featured” button to show off. Have a wonderful week!
~R
For some unknown reason, I have been diligently saving my jars! Now I know why. I love the aqua blue color. Gotta go now…goin’ to try this.
Thanks!!!
Gail
Hi! LOVE these. Was wondering if you could tell me what color you used for your stool. I want to do my kitchen cabinets like that and LOVE the color. I know you’re probably IMMENSELY busy, but if you could leave a comment here, I will be back to check. Thanks HUGELY!! I LOVE your blog; am a new follower.
these are absolutely beautiful!
very, very pretty! thanks for sharing.
found you at roeshel’s
gail
Hey! Hope you’re doing well, thank you so much for stopping by . In regards to the paint color for the stool, I’m sorry to tell you that I used a mixture of acrylic colors that would not be suitable for your cabinets. I can only suggest that if you really like the color find a picture of it(even one of mine) print it and many paint stores can match the color. (?) sorry I couldnt be of much help!
Thanks again and hope to see you again soon!
Hugs,
Lucy
I love these!! I am your newest follower!!
Audrey @adaywithadomesticengineer.blogspot.com
Thank you, Lucy. That is a good idea. I appreciate your time. Have a wonderful spring break with your kids!! 🙂
wow ~ how neat! i LOVE blue mason jars…never would have thought about making my own!!
Oh wow! now that is awesome! Thank you so very much for sharing!!!! I am a happy new follower. ~Stacey
Feature Alert! Feature Alert!
That’s right! You were featured today over at Today’s Top 20!
Hope to chat soon!
Amanda
http://www.todaystoptwenty.blogspot.com
oh wow!! love those jars!! i just got to be your follower coz I really want to try the tutorial, thank youuuu sooo much for sharing the tutorial and those gorgeous photos! you’re soo crafty and talented!! Happy feathered nest friday! 🙂
Even if the paint washes off…they’re so amazing. The color you chose is outstanding. And the display is so artful!!! Well done.
My Friday’s Link:
My Handmade Lighthouse Dolphin Shelf
I do hope you’ll find time to stop by for a visit with me. Have a super weekend!!!
Love these! Just became a new follower, great job!
Rachael 🙂
I’m a HUGE, really HUGE, lover of colored glass. This would be a great project for a bride-to-be that desired having this color and/or mason jars in her rustic or beach wedding.
Thanks for sharing,
Shanna
http://www.revampedfrenchmaison.com
Now that Display of Beautiful shades of Blue is Perfect…. Thanks so much for sharing!
Cheryl
Awesome job! Turquoise is my favorite color. Can’t wait to try this. Thank you for the tutorial.
me encanto como quedaron esas botellas,gracias por demostrarlo, saludos desde argentina, mely
Very neat idea! Its a great way to recycle ordinary jars and looks fun to do. I will have to try it:)
This is insanely creative and fantastic!! Love it! Thanks for the tutorial too- your jars are beautiful! Thanks for sharing at FNF! 🙂
This is so cool! Who knew?! I’d love for you to submit this to the M&T Spotlight at http://www.makeandtakes.com/spotlight
Thank you for the awesome tutorial! I might have to try this.
They look so pretty blue! I linked your tutorial to my Mason jars post too, it’s really good!
SUCH a fab idea!
I just came across your photos of these jars on Pinterest! This is excellent! I have been wanting the blue jars but they are rare and I was wondering how to make them! Great job…
Couldn’t you spray them with some sort of clear coat so that they have a permanet finish? Just thinking.
I was sent this by a friend and JUST finished making 5 (as that’s all the mason jars I had w/o breaking into my good canning jars, lol) pink ones. I ended up doing two coats to get a more prominent pink color (as just one was noticeable, but faint) SO pretty. they’re now on my mantel as candle holders
Also I used tacky glue, lol.
Congrats! You’ve been featured!
http://www.bigklittlea.com/2011/06/my-favorite-things_17.html
gorgeous… your hard work paid off =)
xoXOxo
Jenn @ Peas & Crayons
I just got a large amount of old jars and I can’t wait to try this. these look so lovely!
Love them! I can’t wait to try it!
susan
I did this project for a bridal shower. I used the pour method the first time and failed. Then I decided to make a thicker mod podge to water ratio and while it took more time, I was nearly drip free. I just baked them in the oven for 1 hour at 200 degrees. After the bridal shower I just peeled the paint off and ran the jars through my dishwasher and they looked brand new.
Great project! I’ve posted a link to it on my blog over at craftgossip.com where I’m the Glass Arts Editor.
Have a great day!
Cathi
Hi All,
Hope a few suggestions help.
!. Wouldn’t it be nice to put a few strings of lights over and in the jars so that you can enjoy them in the evening.
2. If you want to take off all the coloring/glue try to peel it off first this will keep yor job from being so gooy.
3.If you put silk flowers in the jars try taking a butter tub, or at least a container you can clean out, dump a cup or so of stone or glass marbles in the tub. Add about a teaspoon of ModgePodge, if that, in to the stones and mix, covering all the stone. Now gently dump this mixture into the jar with the stems. Set it a side to dry.this may take a few days depending how good the air circulation is and the MP will turn clear. This will work best in a jar that you paint the out side cause remember any Elmers or MP that gets wet will get gooy and then dry again but will look yucky.
I like using Gloss MP it looks more like glass when dry.
Me
Those are crazy beautiful! I would never have thought it would only be the glue/paint/water mixture!
A few of my friends just recently made comments about wanting to dye glass jars- what perfect timing!! I’ve shared this post on my facebook page- http://www.facebook.com.crafterhours. Thanks for the great project!
These are incredibly cute. I have no space for such beauties in my apartment, but I am definitely bookmarking them for a “someday”…
Also, if you did want them to be permanent, I would suggest a spray varnish or shellac. =)
This is such a unique and great idea! Now I have a reason to collect jars!
Fabulous tute! Your pictures are amazing, and I love the bottles. Thanks so much for the warning – I think it’s a minor problem, I can totally handle not washing the outsides. I never wash my vases, this is a great excuse!
I absolutely LOVE these!! I saw on another blog that after 24 hours of drying, you can put them in the oven at 325 degrees for 40 minutes on a cookie sheet and the jar will keep it’s stain permanently. Her process was a litte different, but it’s worth a shot! Thanks!!
Saw your tutorial over on CRAFT. Love this!! Can’t wait to try it! You pictures are beautiful!
Gorgeous!! I hope to be trying this technique soon as I have a bunch of glass jars. Thanks for sharing it!
Cheers,
Tracy Screaming Sardine
thanks for the tutorial! I made my own versions of the jars (seven of them, bought from goodwill today!) and wrote about my different experiences with the technique here on my tumblr, along with many a pretty photo, http://upthink.tumblr.com/post/7601398537/hope-in-a-jar-inspired-by-this-post
I hope you check it out! 🙂
absolutely wonderful, I loved
love
LOVE this! Found your site by clicking over from Jenny Doh’s site! And I was wondering…would a clear spray sealer keep the color from peeling off? Can’t wait to try this project! 🙂
I used glass paint on some mason jars and got a nice result too. This paint is made so that you can bake it in the oven (as someone mentioned earlier) and it’s very durable after you do that.
http://amountainbride.blogspot.com/2009/06/diy-make-vintage-mason-jars-seriously.html
It took me a little practice to get a good result, and I used a lot more thinner and also gloss medium made by the same company to get my results than the author did. I made several of them for wedding centerpieces.
Hey I’m assuming you would be able to use just about any color food coloring you want, but I just wanted to check first!
Have you tried any other colors? Red, yellow, etc.? I was thinking it would be great for wedding reception decor in the wedding colors…
Did you know that Mod Podge makes an outdoor version? It’s more water resistant and has a tougher finish that will hold up better than the regular version. Just thought you might want to know!
Hi Lucy, I loved your creative idea and style of writing the good and bad points of it and giving all the alternates…
off to read more on your site.. first time here.Cheers
-Tara
Awesome, definitely going to have to try this one! Repinning you to Pinterest!
Another great craft idea from you. Why didn’t I think of that? I like the little streak. Good one. My name is Loo.
asd
Found you on pinterest! Love this Idea, Forwarded to a friend who wanted blue jars for her wedding.
Very cool! I must try this. Thanks for sharing 🙂
I “Heart” the ladybug nest. Anything with a ladybug has my attention. Thanks! – Marsha…sayer13@hotmail.com
saw this and was intrigued…. hope you don’t mind but I shared it on my blog.. https://mystudiobellingham.wordpress.com/2011/09/05/something-to-try/
cheers
So beautiful and great step by step….but I hear you on the paint washing off….I just re-did some jars using vitrea 160 transparent glass paint in a turquoise.{it stays on after you bake the jars in the oven} If you are like me…always looking for a little help and inspiration. Here’s what mine looked like. http://andersenseven.typepad.com/spring_event/2011/08/spring-event-flash-.html
Love your site.
My color was good, but did not get the transparency that you did. Mine are transluscent. How do i get the clear shiny finish?
Agree with post #75, I just tried this out and mine are lovely but have a frosted glass effect instead of shiny, normal-looking glass. Any idea what went wrong and how to correct?
i read that putting them in the oven makes them washable!!
heres the link: http://tatertotsandjello.com/2011/03/guest-project-make-diy-painted-mason.html
That is a real innovation. Making scrap to beautiful works.
I love this project. Thanks for sharing. I featured it on my blog. http://therusticalley.blogspot.com/2011/10/repin-wednesdaysdiy-projects.html
Did you use glossy mod podge or elmers glue? I’ve tried both and mine aren’t turning out. I’m trying to figure out what I’m doing wrong.
Yours look fantastic!!
angellsworth at gmail com
Totally just did this today but I chose the put it inside and shake method. However, I baked the stuff in the oven. I let it dry upside down 30 minutes then put it upside down on wax paper covered baking sheets for 20 minutes then turned it over and let it bake another 20 minutes. Did 2 batches and it worked best with the oven set at 200 degrees. Happy tinting!
This looks like a fantastic idea and so very pretty.
Have you thought of using USARTQUEST Perfect Paper Adhesive Gloss or Matte which can be used on Glass. The directions say it dries to a transparent gloss or matte finish, and is water soluble and water resistant when dry. From using this product in the past it does not peel either. Susan Pickering Rothamel would be great at answering questions on the glue part.. shes wonderful and so artistic! I can’t wait to try this! Thank you for a lovely share! https://www.facebook.com/us.artquest
Betsy
http://www.theartistchallenge.com
http://worksbytizzylish.blogspot.com/
These are OMG beautiful! So creative. I think Betsy is right. USArtQuest’s PPA – Gloss would be perfect. I’m sad to say, both alcohol inks and food coloring will fade if you put these gorgeous jars are put in the sunlight, so I would suggest Perfect Pigments…just a drop or two to the adhesive. I’d also mix in some water so that both the brushing or pouring technique will work. I’m bookmarking your blog. You’re so inspiring!
Olá!
Adorei esta ideia de pintar com cola e corante alimentício,
super criativo e da um efeito lindo!
Obrigada por compartilhar.
Beijos!
Hi,
These are absolutely gorgeous! I had to try this. Like some of the others mine are coming more frosted than clear. Also, any that I try to paint on the outside are blotchy. Any suggestions?
Hey Katie, thanks for stopping by…if you are using glue the result will be more frosted than if you use gloss modpodge. In terms of the blotchiness, the solution might need more water….this is where patience comes in..just keep trying various ratios… You’ll get and you’ll love it ! Thanks again…let me know if there’s anything else…xo
Hello, i think that i saw you visited my weblog so i came to “return the favor”.I am attempting to find things to enhance my site!I suppose its ok to use a few of your ideas!!
Featherlite Volleyball (SET)
Normally I do not read post on blogs, however I would like to say that this write-up very forced me to check out and do so! Your writing style has been amazed me. Thank you, very great post.
Sorel Women’s Helen Of Tundra Boot
Saw these jars on another site but they were the jars that were already blue glass. I thought, there must be a way to duplicate that. Thank god for this site!! I have tried 4 jars so far and have come up with the frosted glass also…frustrating!! I washed them all and am going to buy the gloss modpodge today. I am displaying black and white photos in the glass jars for my father in laws 65th birthday so I have to be able to have the transparency. Glue was not working for me at all. Keep you finger crossed for me, I only have two days left before the party..lol Thanks for this great idea
Does anyone know if using tacky glue will help with the peeling and water issues? Just wondering. We live in a humid climate, so I was hoping that the tacky glue would help.
Pretty! Have you tried spraying the insides of the jars with anything (like a clear spray paint/sealer) to see if that would help them to be more permanent?
Very interesting! Thanks for the info =)
Enjoyed the instructions and will give this a try. Thanks.
These look amazing!!!!!
Anne
Hello. It’s a long time ago you posted this idea.
I love it!
You have a beautilful blog with so many idea’s and tutorials.
Thanks for sharing.
Have a nice Mothersday.
Love Annette
Couldn’t you just varnish the outside of the glass once you paint it? That way it wont peel off?
they have an outdoor mod podge now that is a little more water resistant. I would still recommend using it on the outside.
The concept here is so wonderful, it can be really versatile at home.
Great and informative tutorial…your jars are gorgeous…..Thanks so much..!
Ok forgive me if someone has already asked this…but I was thinking that this would be great for making stained glass windows. (Faux. On the INSIDE of the house. And when you’re sick of it just wash it off. Has anyone tried this?
It seems so simple but without it. We would never be able to close jars in a proper way. Mason was a genius.
-Zane of ontario honey
I all the time used to study article in news papers but now as I am
a user of net so from now I am using net for articles,
thanks to web.
Take a look at my site : numerology calculator
Thanks for finally writing about > “Mason Blue Glass Canning Jar DIY” < Liked it!
Feel free to visit my web page … how to download movies
We’re a group of volunteers and opening a new scheme in our community. Your website offered us with valuable information to work on. You’ve done
an impressive job and our whole community will be grateful to
you.
Here is my web blog … free iphones
Hi there! I referenced your post in my own post about up-scaling and reusing old jars rather than throwing them out. Thanks for sharing the great idea and for the inspiration!
can you put this on out side of jar? and if it’s on inside is it safe to use a tealight in side?
I just did a few jars following your directions and they all turned out foggy. Judging by your pics I expected them to turn out clear and just tinted with color. Do you know what I can do to get them to not be cloudy and instead clear?
I’m nοt that much οf a intегnеt геader to
bе honeѕt but your sіtеs
rеаlly niсe, keeр it up!
I’ll go ahead and bookmark your website to come back down the road. Many thanks
My web page; pikavippi
My page : pikavippi
I would like to try this on a few wine glasses for my daughter’s wedding. Is this toxic? I am sure that I can tape off 1/4″ down from the rim…
Is this a one time application of your mixture or is several applications needed?
Do you mind if I quote a few of your articles as long as I
provide credit and sources back to your site? My blog is in the very same area of interest as yours and my users would really benefit from a lot of the information you present
here. Please let me know if this alright with you.
Thanks a lot!
Feel free to surf my web blog – Clothing Stores Online
Everything is very open with a precise clarification of the issues.
It was definitely informative. Your site is very useful.
Thank you for sharing!
My web site … http://www.zulutradeonline.com
My web page … זולו טרייד
do you know if this technique works on plexiglass?
When at thrift stores, yard sales or antique stores, keep your eyes out for safe containers of any kind. You can usually find a nice and cheap selection of containers such as candy jars, a classy favorite for many and they usually comes with a rubber seal, a variety of old and fancy glass or crystal containers and sometimes great pottery or other creative containers.
I love how yours look idea,but can’t seem to get a perfect result with no air bubbles!
I love this! And your tutorial is very easy to follow (I say this not yet trying it, but with a hopeful mind about trying it! Lol.)
I want to use this method for “painting” old mixed glassware I picked up at a Salvation Army to make it uniform and vintage feeling for the dessert table at my wedding. Can’t wait to try, I just need to pick up some glue.
I love this ! I just have a few questions and I don’t know who to ask lol but um I have this idea of making a mosaic like frame for a picture made out of glass shards. Would this method of stained glass bottles work for the shards? Please let me know.
Thank you !
No doubt about its creativity. It just stuns me.
toyota windshields
My first post on your blog and really it is just to say thanks for your Nice Post And Shairing
You always pick such interesting i visit your blog regularly for updates!
Loved your description of it.
Thank you for picking this one.
http://mp4mobilevidios.blogspot.com/
Very Very good and usable post. Thank’s to share your experience with us. I will try to remember these tips in my blog commenting task.
Great tutorial! I’m SO doing this today!! Thank you!
Lesley / bytheporchlight.com
Love these… Gotta try my hand at this..
What´s the name of the script font are you using here for headlines? Very nice.
Awesome craft idea.The threaded neck on glass jars that we take for granted today was once a major innovation. Loan against gold
These make me so hopeful for Spring! Planning to share on my other blog, Mason Jar Crafts Love, this week. Just one photo and clear link back to your fabulous tutorial!
🙂 Linda
Have you tried other colors? For my craft I would like red and yellow so i guess i could use cherry or lemon flavors?
I definitely respect and am grateful for your point on every single object.
bubblegum casting
This information is really good and thanks a ton for sharing it I m looking forward desperately for the next post of yours..for more details something like visit candle wholesale get more informations.
I am really appreciating very much by seeing your interesting posts.
is bubblegum casting legitimate
The stuff written in the blogs have allured me!!! bubblegum casting reviews
I was searching the blogs for a long time and that is good to know that I have found such blogs here. Great working! Keep it up!
Additional Info
I was searching for decisive information on this topic. The information you have provided in the blog is really important.
visit this site
Waooow!!! Really very cool site of blogs. You can imagine what you have done for me.
helpful resources
You guys allow it to be quite simple for all your folks available.
click here
I’m dotty for your best article writings and contents auspiciously.get jobs
Thanks to share these details it’s truly nice.
Panasonic ES-LA93-K/ESLA63-S Arc 4 review
Your writers have capability to make understand the users, great stuff you have provided to us.
Philips Norelco 1160x Review
I absolutely love this idea! Great DIY & so gorgeous xx
Many thanks! For sharing such type of blogs. That’s a great help of me. Hope you must keep on updating the latest posts… resume templates
It’s offensively easy to seek out any matter on web as compared to books, as I found this text at this website.home chef
Whatever you have provided for us in these posts really appreciative.vivint home security
The content on your web site never confuses me. Keep it up!!thecreditpeople
Totally unique stuff is here really amazing!!!
vivint security reviews
painters woodbridge vaIt’s been good to see your blog when I always look for such type of blogs. It’s great to discover the post here.
I was very encouraged to find this site. I wanted to thank you for this special read. I definitely savored every little bit of it and I have you bookmarked to check out new stuff you post.
Clipping Path service
Congratulations guys, quality information you have given!!! best electric shaver blog
We are a group of volunteers and opening a new scheme in our community.
Your web site offered us with valuable information to work on.
You’ve done a formidable job and our entire community will
be thankful to you.
Also visit my blog post
هنا
هنا
افضل شركات نقل وتخزين الاثاث
اشهر شركات نقل وتخزين الاثاث بالرياض
أفضل شركات مكافحة الحشرات بالرياض
نقل اثاث
كشف تسربات المياه بالرياض
شركة تنظيف
نقل عفش بمكة
شركة الأحمدي للنقل بمكة
شركة عزل خزانات بمكة
شركة كشف تسربات بالرياض
تنظيف فلل المدينة
شركة تنظيف مسابح بالمدينة المنورة
شركة تنظيف بالبخار بمكة
شركة عزل خزانات بجدة
نقل عفش بالدمام
شركة تنظيف منازل بالدمام
تنظيف فلل بالرياض
كشف تسربات بالرياض
شركة تخزين أثاث بالأحساء
شركه رش مبيدات بالجبيل
عزل خزانات بالرياض
شركه نقل عفش بالخرج
شركة كشف تسربات المياه بالقطيف
افضل شركات نقل وتخزين الاثاث
اشهر شركات نقل وتخزين الاثاث بالرياض
أفضل شركات مكافحة الحشرات بالرياض
This is an informative blog by which I have got that info which I really wanted to get. cronus tippmann
What a great blog it is!!! You are in truth on your way to colossal success. Well done. Top Rated Electric Shavers
Great blog post! I don’t understand how long it will require me to obtain through all of them! cotton sheets
I decided to make some light shades and some darker ones. … greenframesunglasses.blogspot.com
… rusticcandlelanterns.blogspot.com
… wholesaleframedartprints.blogspot.com
… wholesaleframedart.blogspot.com
I love this blog because it is user friendly with appreciative information. How to lose belly fat fast
The Info in the blog is out of this world, I so want to read more.vaginal reconstruction cost
lifeshield security
Hi guys, I am again at the same place, and reading this post, it is also a pleasurable article, so stick with it.
painters woodbridge vaThank you so much for such a great blog.
credit repair services
Hi to all, the blog has really the dreadful information I really enjoyed a lot.
… rusticlampshades.blogspot.com
Great blog you people have made here on this blog site, I will absolutely appreciate your work.
click over here
Your write-ups are far more than wow! click this
Your blogs are easily accessible and quite enlightening so keep doing the amazing work guys. Jap Byg
I suppose I’ve selected an unbelievable and interesting blog. Bignold Painting
write my essay
I have checked this link this is really important for the people to get benefit from.
http://www.bigklittlea.com/2011/06/my-favorite-things_17.html … candlebulk.blogspot.com
The blog is good enough I again n again read this. Steel doors
teluate
It’s an outstanding article in favor of all the web guests; they will get benefit from it I am confident.
I really enjoy reading and also appreciate your work. http://www.gvlha.com
I’m glad to locate so much of informative data in your blog. Water Damage Pros
Hurrah, this is the thing which I was searching for, what a cool stuff it is!!! top rated refrigerators
I was searching about this issue as you have discussed very clearly and lovely manner that I don’t have to go now any other webpage. water damage restoration nj
I never ever saw such blogs and the knowledge you have given that is accurately to the point and in simple wording, I like it! welding contractors
You have really selected the suitable topic; this is one of my favorite blogs. CSWaterPros
These are just adorable! And the yellow goes so well with the blue!
Amazing post to described a trouble-free way and created the jars reusable. The recycle things may also are employed future nice concept. Mold Inspection Washington DC
Thanks! I needed to paint some glass on an old lamp where the paint had peeled off and I didn’t want to spend 12 bucks on stained glass paint just for two little glass panels.
I did this project for a bridal shower. I used the pour method the first time and failed. Then I decided to make a thicker mod podge to water ratio and while it took more time, I was nearly drip free. I just baked them in the oven for 1 hour at 200 degrees. After the bridal shower I just peeled the paint off and ran the jars through my dishwasher and they looked brand new.
Awesome, definitely going to have to try this one! Repinning you to Pinterest!
obviously like your website however you need to check the spelling on several of your posts. Several of them are rife with spelling issues and I to find it very bothersome to tell the truth on the other hand I will definitely come again again. kfaggebafkeb
Wonderful beat ! I wish to apprentice even as you amend your site,
how could i subscribe for a blog web site? The account helped me a acceptable deal.
I have been a little bit acquainted of this your broadcast provided vivid
transparent concept
I have noticed you don’t monetize your website,
don’t waste your traffic, you can earn additional cash every month
because you’ve got high quality content. If you want to know how to make extra $$$,
search for: best adsense alternative Wrastain’s tools
Awesome, definitely going to have to try this one! Repinning you to Pinterest!
https://mobileamplifiers.net/
last minute tours , prices and deals.
https://www.androidcloob.com/ is android app and game
Very informative blog you share and I will save you blog in future reference.
great blog. i am following to you after that.
thank you for this great site.
thanks
http://lahzeakhar.com/%d8%aa%d9%88%d8%b1-%D8%B4%DB%8C%D8%B1%D8%A7%D8%B2
Great Ideas. Must have this at home very simple yet unique to look at. Thanks for sharing.
going to have to try this one! Repinning you to Pinterest
http://seoyab.com/%D8%AE%D8%AF%D9%85%D8%A7%D8%AA-%D8%B3%D8%A6%D9%88/
I want to thank you for your topic
Thank you for everything you have done, and I know that all of us adore you.
Seriously, you saved my day.
Thank you, you were awesome.
There are a few who step in always.
i like it
very good website
good luck
love your content
i visit ypour website every day
thank you
Hello
I happened to come from Google here
It was good
Send me here for my friend
Thank you
Hello
I happened to come from Google here
It was good
Send me here for my friend
Thank you
shomalia.com
I happened to come from Google here
It was good
Send me here for my friend
Thank you
donpro.ir
I happened to come from Google here
It was good
Send me here for my friend
Thank you
parlyanads.ir
I happened to come from Google here
It was good
Send me here for my friend
Thank you
parlyandev.ir
this is great
Thank you
thats great!
Thank you for a wonderful article! I will be sharing this with students interested in studying in Barcelona. I have heard of Montserrat but have never visited. After your read, I’m definitely adding it my wish list of places to visit.
I think these are beautiful, Lucy. I love the various shades of blue.
I happened to come from Google here
It was good
Send me here for my friend
Thank you
Plewse let me knokw if you’re looking for a aughor for your site.
You have some really good articles and I think I would be
a good asset. If you ever want to take some of the load off, I’d absolufely love to write some material for your blog in exchange for a link back to mine.
Please blast me an e-mail if interested
Nice post. Thanks
The installation process is explained very well and in a very definite way.
Anyone can understand this
Also visit
I happened to come from Google here
It was good
Hello
I happened to come from Google here
It was good
Send me here for my friend
Thank you
https://keysafar.com/flight_search_results/THR/MHD
I very happy that suddenly accost with your site.
these bottles are amazing! thanks for sharing that 🙂
very good
Hello
I arrived here a few days ago from Google
I want to comment so thank you that it is useful
I sent here for my friend. I need her
Thankful
very good thank you
Hi.thanks admin.very nice and very good
Hi there! I referenced your post in my own post about up-scaling and reusing old jars rather than throwing them out. Thanks for sharing the great idea and for the inspiration!
Hello
I arrived here a few days ago from Google
I want to comment so thank you that it is useful
I sent here for my friend. I need her
Thankful
Awesome
I’ll give it a try
Maybe my students can use this art for making extra cash
use seo shop website for your online store
Many people are looking for these kind of arts
I’m one of them
many thanks
https://onlineoyunbu.com/
Lol ct
lol counterlar
taliyah ct
league of legends counterlar
yasuo ct
zed ct
ezreal ct
darius ct
aatrox ct
Interesting ideas. Well designed blog.
https://www.clearance-king.co.uk/pound-lines.html
The article was beautiful and good, thank you. Put these articles on the site again
Hi! LOVE these. Was wondering if you could tell me what color you used for your stool. I want to do my kitchen cabinets like that and LOVE the color.
i just say thank you for this.i love this site
thank you
Very Effective Tips. Thanks for sharing.
a good news for packing in: http://khouznews.ir/fa/news/254352
These jars preserving tips for food are must be used. Mason has some of the amazing talents for crockery.
These are some of the amazing tips for using usable jars for decoration. I love these photos and it definitely looks awesome.
great job nice article
very god
You have a very good site
thanks for your website
Your are providing really good content here
Car Prices
Nice jobs , i really enjoy this site…
Theses home canning jars looks so great. Some says wool ribbons are best to decorate living rooms.
Wow.. Great work that’s really beautiful
I Realy Enjoyed From this Website ! Thank you for your great information
I was very impressed by this website.
KEEP UP THE JOB
thanks, good article
thanks, good article
best website
I’m typically to blogging and i really respect your pleased. The article has really peaks my interest. I’m going to bookmark your web site and retain examination for brand rapid in mint condition information.
Pretty! This was an extremely wonderful article. Thank you for supplying this info.
I LOVE these post, seriously THANK YOU!
When your website or blog goes live for the first time, it is exciting. That is until you realize no one but you and your.
The best sites to get free backlinks
https://iran-o-t.tumblr.com/
good
good
https://alomember.com/
good
great post I really liked the glasses
https://karopack.ir/product-category/industrial-inkjet-printer/
vest
I use mason jars for overnight oats and have lots of collections at home. Your idea of using these jars is ideal, and you represent it is making me anxious to try these. Thanks!!!!
veri byu tihell site
https://topritm.com/
your post is excellent. i really interested in it. please share more information because I need to use in my project.
download best music 2afm bego kojaeii بگو کجایی
https://b2n.ir/t77515
download best music
http://music1top.blog.ir/1399/12/19/%D8%B2%D8%A7%D9%86%DB%8C%D8%A7%D8%B1-%D8%AE%D8%B3%D8%B1%D9%88%DB%8C-%DA%98%D9%84%D9%88%D9%81%D9%86
great post I really liked the glasses
the best
This is really great
I appreciate your content
Would-be medical exec from Iran barred from Canada over alleged ties to Tehran’s nuclear program. Ramin Fallah was labeled a security threat because he …
https://www.facefarsi.com/profile/zarzizelmi
https://art.alltdesign.com/-36432736
Your blog is really awesome keep it up
I really enjoyed this content!
Nice blog keep it up guys
Your article was really impressive. Do keep post like this…
This Article is been helpful
This is what I exactly need.
I found this article helpful. Thanks for sharing this with us.
Great Post! Thanks for sharing such an informative blog
Great advice, Thanks! Please, what are the Top Comprehensive Company’s safety/Needs? Thanks.
Great Content Written here will surely visit again
I am founding this interesting and a great information to be take home today. I think my uncle will be pleased for hearing this and I will also recommend him to this particular site. Thanks for the educative awareness. Meanwhile, Click here for more ideas. easy information blog
Work hard, stay positive, and get up early. It’s the best part of the day.
افزایش لایک
Good to see your informative article
An outstanding content writing skills shown in this article. Well Done!
you are the best
nice dude
good luck
afzayesh follower like
https://nilopanel.ir/
veri byu tihell site
https://ezp30.com/
Helpful post, thank you.
Mason blue glass according to this article is awesome
after reading through this article, I was really impreaa.
thanks for your great site bro go on
I comment this about this post. Download CIBN past questions
We clean your pipes by the best technology and lowest price
https://barchasb.net/tehran/punak/
nice post, thanks. hofhv
Very beautiful, thanks
Thanks for sharing this nice article.
Now, you can take packages and prices of Bangladesh cars from this page. https://techoffersbd.com/
This is what I exactly need
https://dp4or.blogspot.com/2021/10/jumma-mubarak.html
I have find the https://www.theliveschedule.com/ that has really useful info regards many of the topics
Im really impressed with the quality of content you are sharing.
This is really helpful info you share in hindi
No words mam how can i thank you.
Shayari Log
Thank you for your efforts.
We suggest you Snapp Food that is a good app.
This page definitely has all the information and facts I wanted about this subject and didn’t know who to ask. Read international funding for projects in Africa
thankyou for your information, very helpfully . Have a great day 🙂
These blue glasses are very beautiful and soothing. I think that if the reception glasses are this color, they will be very beautiful. Have you used any special material to produce this glass in this particular color?
Great words!
Thanks for sharing such a great article.
I think these are beautiful, Lucy. I love the various shades of blue.
Dr Cric brings you information about PSL 2022 Live Streaming and PSL Score Update 2022. For your comfort and leisure, we will live telecast PSL 7th edition on PTV sports, Willow TV and Ten sports. You can also watch all the matches live via drcric.com.
Wow, What a Excellent post. I really found this to much informatics. It is what i was searching for. I would like to suggest you that please keep sharing such type of info. Thanks
Hello and do not be tired
It was really helpful to me – thank you for posting
Are you looking for free GMAT and GRE preparation tests. Then trickytests.com is the place for you. The best and most relevant free preparation tests for your GMAT and GRE exam preparation.
Blue Glass is looks warm and nice I also use blue shade jars for plants.
Beautiful idea. The DIY is so easy to practice along. Really Grateful. Merry Christmas
Blue glass I also like it. Thanks to sahre
This DIY Idea is really great.
great content. I really enjoy.
Thanks for sharing a great article.
Very neat idea! Its a great way to recycle ordinary jars and looks fun to do. I will have to try it @ studymaterials
Thanks for sharing valuable content.
This site was… how do I say it? Relevant!! Finally, I have found something that helped me.
Thanks for sharing this very good post. Very inspiring! (as always, btw)
Great Article, it is really informative and innovative.
I have found something that helped me.
Thanks for sharing this very good post. Very inspiring
Such a good information you share.
Such a good information you share.
thanks
Thanks. Very goooood and useful article
This is an useful information.Thanks you verrry much
I like this site so much, saved to fav.
Breunissen daylight systems
I am really impressed after going through this blog. Keep it up.
Great post thanks for sharing
Get latest news update ndtv today
Thanks Lucy for sharing this post,Very good article
Google Adsense. The blog’s Domain Authority (DA) is 20 and Page Authority (PA) is 36 and Alexa Ranking is 81,300, this metric was seen in the Fire Hindi
Asia Waste Company is one of the largest buyers of all types of metal and colored waste in Tehran, which is ready to buy partial and total waste from any part of the country. Our collection will buy your waste at the highest price and cash settlement, just contact us. Our experts are ready to be on site 24 hours a day and 7 days a week to observe your waste and buy it at the best fair price.
Very good post.Thanks for sharing this post….
This looks so good! Thanks For Sharing this amazing. Love it
you done great job, and shared some informative post with us, also show some post for adventure tours like desert safari, dune buggy self-drive Dubai tour
Your post is very nice thanks for share tcs sargodha
These blue glass canning jars are are great for decoration. The fuel bowser truck is a great addition to your company. The insights are information.
Thanks for sharing really informative blog about mason blue glass canning jar diy. You also need to read about Paint Can Sizes.
Great! Thanks for sharing really informative blog about mason blue glass canning jar diy. Also read: 14 Ply Trailer Tires
nice post vipfbtools
Great informative content like the service of Australian Property Buyers Agents
you have a great site with awesome contents. i going to see your site every day.
Very good content.thanks for sharing
https://thesocietypages.org/socimages/2019/09/11/normal-distributions-in-the-wild/
I love how you presented the excellent and bad news; it is incredible to do some DIY. Thank you for sharing this.
it is incredible to do some DIY. Thank you for sharing this
going through this blog. Keep it up
Really Grateful
رزرو اتاق فرار کرج
https://www.enigmaescaperoom.ir/tag/Karaj-escaperoom
I have seen your post and it was great! I need this types of post for more information. Keep doing the best.
best betting site is betforward, you can play casinos
Learn to create, analyze and interpret data to improve business performance. The Business Analytics Course is a professional-level online short course for business analytics practitioners and executives who aim to improve their understanding of data-driven decision-making. data business analytics courseData is everywhere. It’s in the business, technology, and even your own personal life. Data can help businesses think critically about the way to improve their product or services.
Dayitwa Ngo gives support to Women in form of education and gives access to plethora of essential services. With the help of this program women get a chance to learn new things from their abilities and gain knowledge Women Empowerment Program to get numerous benefits. This program has positive impact on the lives of women and helps women learn new skills, and status in society.
very good site
very nice
in work, you should know that: farsi blogs article but translat this… thanks my freind
read this article in my website: shahr mohtava
Nice post thanks for share this awesome e post
Really appreciate your post. keep sharing valuable info with us.
http://looleh.blogfa.com
https://hafrechah.blog.ir/
http://tamirlool.rozblog.com/
http://iranloole.parsiblog.com/
https://arzanloole.loxblog.com/
https://rfge.niloblog.com/
Stone Depot® is one of Australia’s largest importers and wholesalers of natural stone and tiles which includes a wide range of Travertine, Sandstone, Limestone, Granite, Marble, Bluestone, Slatestone pavers and tiles to compliment natural stones.
Stone Depot® is one of the largest Importer and Distributor of Natural Stone in Australia from India, Turkey, China, Brazil, offering a complete range of natural stone such as sandstone, limestone tiles, travertine tiles, slate floor tiles, marble tiles, bluestone and granite in the form of outdoor tiles and pavers, slabs, pool coping, tumbled, cladding, and more.
yes i agree thanks for great article
You can get birthday party decoration items in Delhi from various sources. One option is to contact 7eventzz, a reputable event management company that offers birthday decoration services. They can provide you with a wide range of party decorations and handle the setup for you. Additionally, you can also explore local party supply stores, online marketplaces, and dedicated party decoration shops in Delhi to find a variety of items for your birthday celebration.
This article helped me a lot
This article is very awsome for me a lot
i agree This article is very awsome for me a lot
I really liked your article… You can also click here to see attractive high heels
http://yarmaz.com/cat/women-shoes-high-heels
Pixelgyan.com has an exclusive Education portal which brings real-time, authentic updates on technology, digital marketing, Business, startup stories, exams, application deadlines, cutoffs, results, college admissions, course launches, new campuses, scholarships, placement reports etc. at the fingertips of students.
There are the Best Private Colleges in Dwarka, Delhi that offer quality education and are well-known for their academic excellence. These are 6 best private colleges in Dwarka, Delhi-
i very happy to see this post in internet and i read Mason Blue Glass very articles but this is the best
I love how the author provided some history about Mason jars, and it’s interesting to learn about the innovation behind them. While I understand that the paint will eventually peel off, I still think these jars would be perfect for decorative use in the home. I can’t wait to try this DIY project myself!
I really appreciate the author’s honesty in sharing both the good news and the bad news about this DIY project. It’s great to know that while the jars look beautiful, they may not be practical for everyday use. However, the author provides some helpful tips for avoiding paint peeling, such as using the brush method and being careful when pouring in water. Overall, this tutorial is a great resource for anyone looking to add some vintage charm to their home decor. I can’t wait to give it a try!
I really appreciate the author’s honesty in sharing both the good news and the bad news about this DIY project. It’s great to know that while the jars look beautiful, they may not be practical for everyday use. However, the author provides some helpful tips for avoiding paint peeling, such as using the brush method and being careful when pouring in water. Overall, this tutorial is a great resource for anyone looking to add some vintage charm to their home decor. I can’t wait to give it a try!
This is a well thought out article with great points. Thank you for this.
I love the colour and style of these glass jars
When it comes to discovering the perfect platform for your talent in Delhi, the city’s top casting agencies, including the esteemed Reelz Production House, stand as pillars of opportunity. Their knack for identifying the right fit between actors and roles is truly remarkable. A reliable choice for anyone aspiring to shine in the entertainment spotlight within Delhi’s thriving creative arena.
https://zinbeauty.com/
love to see this post
ok for more designs you can visit here
ok love to see this post
Project resource card top academic pdfs, handouts, student essays
https://prozhecart.com
Thats really great i like this content if you want to rent a car this is also the best option http://www.rentacardubai.pro
Thanks for sharing.
Great tutorial, Lucy! I appreciate the detailed steps. I tried a similar project once but didn’t get the shading quite right. Your tips about the ratio of glue and food coloring are really helpful. Can’t wait to give it another go.
I love the rustic feel the jars have, especially against that cement wall backdrop. The contrast of the yellow flowers with the blue hue of the jar is simply captivating. And kudos for the detailed experimentation. The good news and bad news segments were an engaging touch!
This was such an informative and delightful read. The link between John Landis Mason’s innovation and today’s DIY project is a testament to how inventions from the past still influence our crafts today. Well done, Lucy! Looking forward to more of your posts.
Great work. Keep it up.
Gadget Store PK
https://www.gadgetstorepk.tech/
website is dedicated to featuring and reviewing a variety of best gadgets, internet packages, and prices of various products in Pakistan in terms of technology.
Our group comprise of the flourishing combination of young and experienced individuals. Each member of our Fuji Ac drives has gained experience from the elite and prestigious group of companies, like TATA POWER LTD, ROCKWELL AUTOMATION LTD. ABB LTD. & FUJI ELECTRIC CORPORATION JAPAN.
What is SEO?
Vibrant MediaTek is one of the leading digital marketing agencies in India founded by Vivek Kumar Rao. Established in 2021, it guarantees to make your brand a full-fledged online giant. It specializes in Search Engine Optimization, Search Engine Marketing, Social-Media Optimization, Social-Media Marketing, Lead Generation, E-Commerce SEO, PPC and Design services. This not only brings valuable traffic to your website but also gives you a strong foothold in your industry.
Great tutorial on creating a DIY project with Mason Blue Glass Canning Jars! Your step-by-step guide adds a creative and personalized touch. Thanks for the crafting inspiration!
Good job
Vibrant MediaTek is one of the leading digital marketing agencies in India founded by Vivek Kumar Rao. Established
I highly recommend schoolnewsinfo for its comprehensive and up-to-date coverage of educational news and information. The platform provides a user-friendly experience, keeping students, parents, and educators well-informed. With its reliable content and easy navigation, schoolnewsinfo.com is an invaluable resource for anyone seeking relevant updates in the education sector.
No words mam how can I thank you?
Harry
I really enjoyed the content you posted. If you are looking to know what is going on in the novels? Or do you like to read many opinions about famous movies or beautiful impressions of them, I suggest you the site abolfazlmeybodi.com.
It is really a wonderful site!
best helmets motorcycle accessoris live in tehran
Welcome to Smart Home Castle, where we share our knowledge for Home Automation. We’re passionate about making your home smarter and more comfortable, Stay up-to-date with the latest trends, products, and tips in the industry, Join our community and discover how technology can transform your home. #Homeautomation #Automationgadgets #Automationproducts
thanks for sharing this idea on it really helped me
Your feedback on the astrology article is much appreciated. I’m glad you found it valuable and engaging, and I hope it benefits your friends as well. Thank you for sharing it. Solar Module Distributor
I appreciate your article and found it to be highly relevant to my interests. It offers valuable and informative insights. Thank you for sharing this exceptional piece. solplanet inverter distributor
Thanks for sharing this information it really helped me alot
In the vibrant city of Dubai, the juxtaposition of modernity and tradition is evident in every corner, even in the simplest of elements like blinds and curtains. As the sun sets over the iconic skyline, the sleek skyscrapers are adorned with an array of blinds, offering a respite from the desert heat while adding a touch of sophistication to the cityscape. Meanwhile, in the labyrinthine alleys of the old town, traditional textile markets boast a kaleidoscope of colorful curtains, intricately embroidered and adorned with delicate patterns, reminiscent of the rich heritage of the region. From the opulent high-rises to the humble abodes, blinds and curtains in Dubai not only serve a practical purpose but also serve as a reflection of the cultural tapestry that defines this cosmopolitan metropolis.
Great Blog!
Keep it up!
Fantastic post.
ohhh it must be so good!
tnx for this good and old post!
hey there my firends, i’m looking for someone to say i love you!
Thanks for sharing great post
thanks for interesting post
Enroute Travel offers the epitome of travel experiences with their exceptional tour packages departing from Delhi. Renowned for their meticulous planning and attention to detail, Enroute Travel crafts journeys that cater to every traveler’s desires and interests. From cultural explorations to adrenaline-pumping adventures, their diverse range of tour packages ensures that there’s something for everyone. Whether you’re craving a serene retreat amidst nature or an exhilarating escapade filled with thrilling activities, Enroute Travel has you covered. With an emphasis on customer satisfaction, their dedicated team of professionals goes above and beyond to provide seamless and memorable experiences. Each tour is thoughtfully curated to showcase the best of every destination, allowing travelers to immerse themselves in the beauty and charm of each location. With Enroute Travel, embark on a journey of discovery, where every moment is infused with excitement, wonder, and unforgettable memories. Experience the world in a whole new light with Enroute Travel’s unparalleled tour packages, where adventure meets luxury and exploration knows no bounds.
If you’re looking for top-quality natural stone, then look no further than our premium collection. Our stones have been used to create stunning spaces for some of the biggest builders and developers in the USA. When it comes to pricing and value for money, our products are second to none.
Wonderful & very informative article. Thanks for sharing the Useful and Informative Blog.
Great blog post! Thank you so much for sharing it. Good you explained everything in detail it has been a great help.
thanks for your great site bro go on
THANKS YOU!
Tnx for sharing this great blog post!
I really like Your website and article you given is amazing. I have leart alot from it. Meanwhile i want to introduce my self as well I have a website that provides cotton products in bulk.
Very Impressive work
This is very nice article
we are desert experts for more details contact us Desert Safari Dubai
What a brilliantly composed and insightful piece! The clarity and richness of the information kept me hooked from start to finish. Truly a pleasure to read!
Nice Post. Thanks for sharing.
https://rsdigitalservices.com/
Sobha Realty Dubai is a leader in luxury real estate, offering world-class properties in prime locations. Whether it’s a Sobha new launch or an iconic project by Sobha, each development boasts premium design and top-tier amenities. Invest in Sobha Dubai for high returns and an exceptional living experience in the heart of the city.
Your dedication and hard work truly shine! The effort you put into this is truly inspiring. Keep up the fantastic work—you’re making a difference! Your talent and passion are truly remarkable!
For Desert Safari Dubai details, please visit here: https://desertfundubai.com/
This is a wonderfully written and insightful post! The smooth flow of information and thoughtful details make it a pleasure to read.
If you want to take the wheel and navigate the desert at your own pace, our self-drive dune buggy rental options are there for you. Or, if you prefer a more luxurious experience, our private tours are tailored to your every preference. We’ll make sure your adventure is seamless and—above all—exclusive.
https://dunebuggydubai.co/
Dubai Ferry tickets offer a scenic and comfortable way to explore the city’s stunning coastline and iconic landmarks from the water. Operated by the RTA, the ferry service runs on scheduled routes connecting key locations like Dubai Marina, Al Ghubaiba, and Dubai Canal. Tickets are affordable, with options for both Silver and Gold Class seating, providing a unique and relaxing sightseeing experience across Dubai’s vibrant waterfront.
Your post is excellent. Thank you for sharing this valuable information. Great blog thanks for this content i really like it this type of blogs. Fantastic article! It’s incredibly comprehensive and informative. Thank you so much for sharing all this valuable information. Your detailed explanations have been a tremendous help.
I watched Your post is excellent. Thank you for sharing this valuable information. thanks again
Thanks for post, this is really great to know more about buggy ride dubai..!
Thank you, it was a good and useful article.
Thank you for your article. It was great.
At By SM DIAMONDS LLC, we are known for our custom designs, masterful goldsmith. And of course, all things diamonds!
SM Diamonds LLC | Premium Diamonds & Fine Jewelry
At By SM DIAMONDS LLC, we are known for our custom designs, masterful goldsmith. And of course, all things diamonds!
SM Diamonds LLC | Premium Diamonds & Fine Jewelry
Educating clients about diamonds and jewelry is a top priority.
Our clients say the #1 thing they need is guidance from someone they can trust.
SM Diamonds LLC | Premium Diamonds & Fine Jewelry
We offer a great range of school shoes for boys that combine comfort and durability for everyday wear.
Love it!
Great share
I just read your blog and absolutely loved it thank you so much! While reading, I came across another website that shares really informative content about cleaning products and tips. You should definitely check it out!
https://medium.com/@purchoessentials_51743/how-to-build-the-perfect-cleaning-kit-for-any-home-5714adea7cc4
I really enjoyed reading your blog it was super insightful! While going through it, I found another site that shares some great digital marketing tips and strategies. You might want to check it out too!
https://appdevelopment-tys.blogspot.com/2025/10/technical-seo-made-simple-for-beginners.html
Very interesting and amazing details you provide. Thank you for this incredibly informative article. Very interesting and amazing details you provide. Thank you for such detailed description. This article is really amazing, thank you for sharing helpful article.
Islamabad Escorts are waiting for you visit our website and make your life amazing.
Trustworthy adult Escort services In Islamabad can be hard to come by, and there are millions of advertisements out there trying to coax you into it. When you want to feel like you’re truly enjoying your night, there is no better way to do it.
Your blog was an excellent read. The structure, clarity, and depth of information made it stand out, and I appreciate how effectively you presented the insights. It’s always refreshing to come across content that is both informative and genuinely enjoyable.
If you require high-quality content marketing services, feel free to explore this link:
https://www.allinmotion.com/corporate-video
Absolutely love this DIY! The mason jar makeover is such a creative and stylish idea simple yet so beautiful. Your step-by-step instructions make it easy to follow, and the end result is truly inspiring for home décor lovers. Thanks for sharing!
Also, if you’re stocking up on affordable cleaning products to keep your projects and spaces neat, check out Purcho they have great quality items at wallet-friendly prices
Great! love this DIY! The mason jar makeover is such a creative and stylish idea simple yet so beautiful. Your step-by-step instructions make it easy to follow, and the end result is truly inspiring for home décor lovers. Thanks for sharing!
Good article
by https://offermaids.com
I’m truly in love with the artist behind this work and deeply admire their creativity. When I browsed your website, the shapes and colors of the glass immediately caught my attention. But when I watched the latest video, I was genuinely amazed. The designs being created were so fascinating and beautiful that I felt an emotional connection to the artist. I absolutely love this website—these are sincere words straight from my heart. I even showed it to someone sitting beside me who was busy on their screen. However, it made me a little sad to see such a beautiful and captivating website with so little traffic. I will definitely share and support it. I’ve also bookmarked it. Whether this comment stays here or not, these are my honest feelings while experiencing your work
After looking at this website, I don’t feel like looking at anything else for hours now. Believe me, whoever says anything after looking at these things is telling the truth.
Ecollat is a SaaS platform offering comprehensive solutions for Digital Asset Management (DAM), Collateral Digitization, Quotation Tool, Customer Relationship Management (CRM), Headless CMS and ecommerce, and Product Information Management (PIM). Tailored for B2B, B2C, and D2C industries, Ecollat helps businesses streamline operations. Ready to optimize your business? Contact us today to discover how Ecollat can elevate your workflow!