 Romance is the glamour that turns the dust of everyday life into a golden haze – Amanda Cross
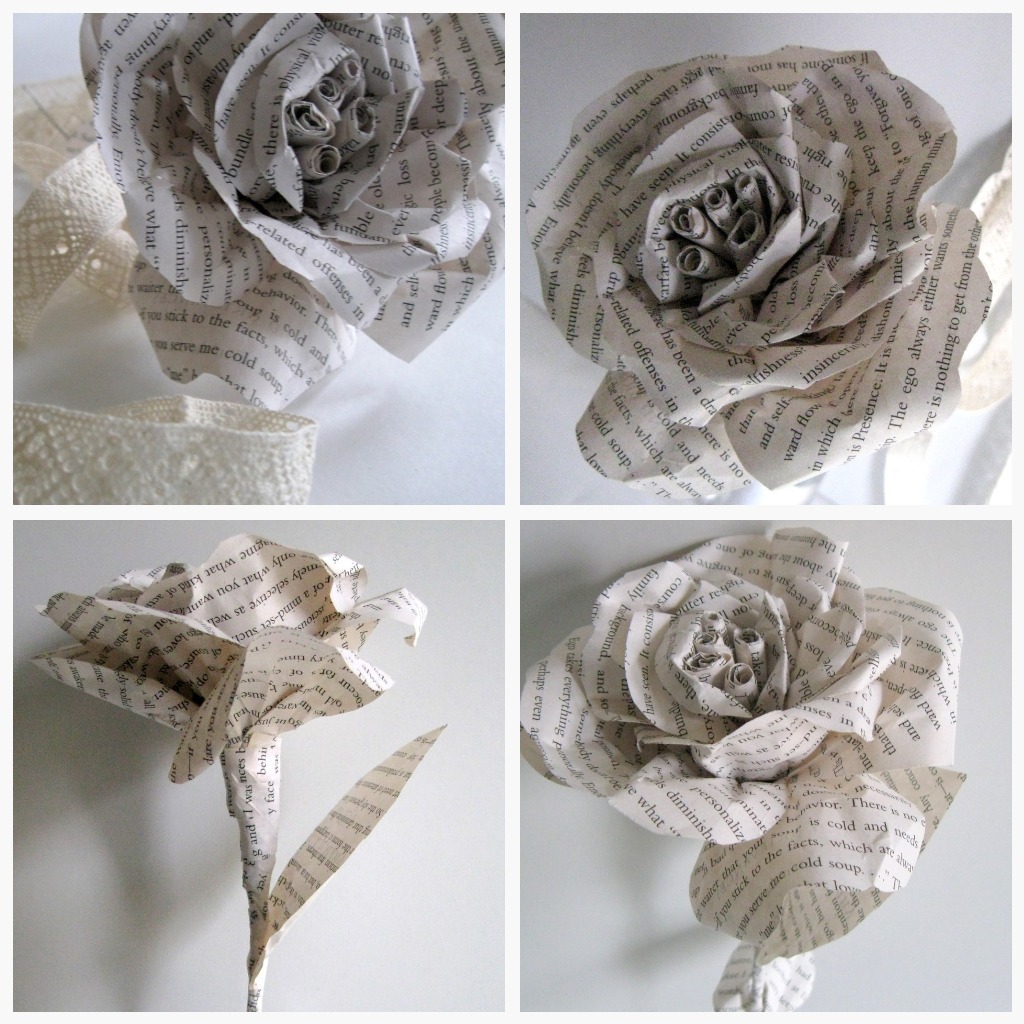
Over the weekend I shared this tutorial at New Nostalgia, I was honoured when Amy asked me to do a tutorial on this flower. What I hadn’t realized however was that I had no idea how to do a tutorial for this specific project.
You see, I often times just let my creativity take me away and I am a true believer that there are no rules when it comes to creating. So I sat down and tried to put together a tutorial to the best of my ‘structured’ ability.
To those of you who are truly paper artists, I apologize if my techniques are unorthodox to your craft. Nevertheless, I hope that you get the gist of it and that you enjoy it!
Materials:
Scissors
Paper (I used pages of a book)
Glue
Clear tape
Masking tape
Floral wire (optional)

1. Cut or rip 5 strips of paper of approx. 3″ long by 1″ wide (these will form the middle of the flower, I believe it is called the stigma…please correct me if you know the right name)
2. Wrap each piece of paper around the toothpick to help you get started on the quilling process.
3. Gather all the little tubes
4. Tape them together

5. Cut 15 petals in total (5 each of large (4″), medium (3″) and small (2″)). These are the sizes that I used but please feel free to alter as you wish.
6. With your scissors, gently curl each petal just as you would curl ribbon.
7. How it looks
8. Start assembling your flower by placing the smallest petals around the stigmas (?) overlapping them as you go around.

9. Continue this process all around
10. I secured it with tape after every layer, making sure I squeezed the paper together tightly. Don’t worry about the petals being perfect at this point; you can mold them after (paper is very forgiving to work with)
11. Continue to attach the petals until you have placed all 15 (from smallest to largest)
12. Squeeze the ‘stem’ tightly one last time and secure with tape
Trim the excess paper and you’re all done !! ( that was easy)
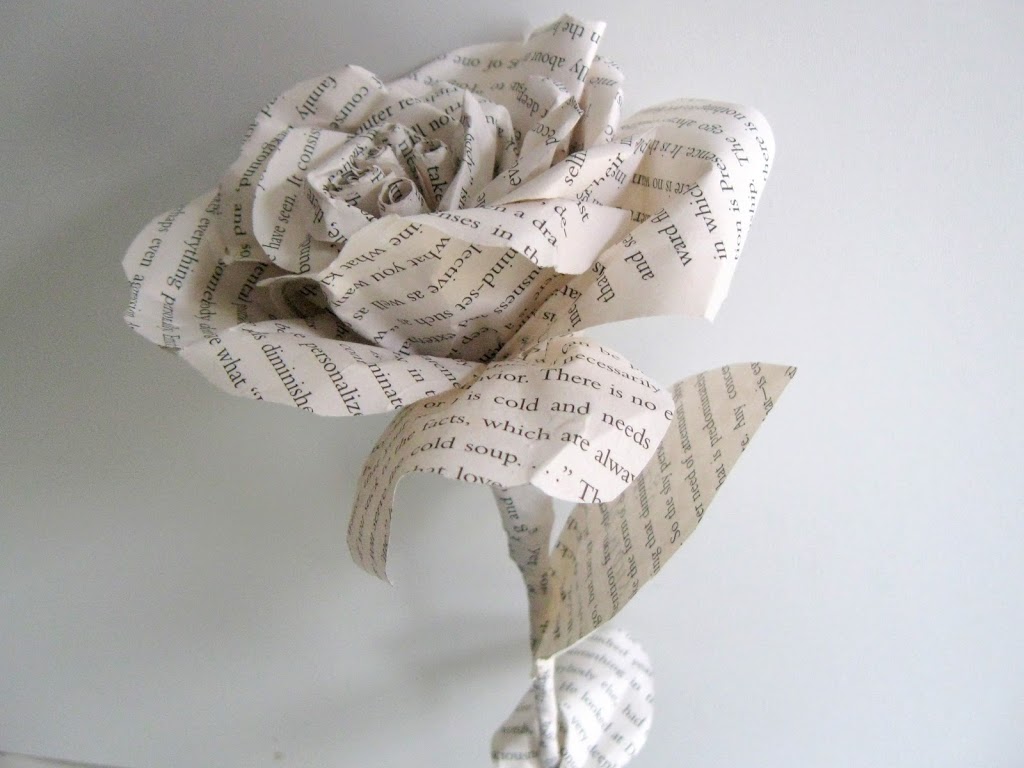
If you would like a stem, follow steps 13-16…

13. Tightly wrap the floral wire ( my wire measure approx 12″) around the flower a couple of times and bend it downwards to form stem.
14. Wrap masking tape around the wire all the way down to the end.
15. Cut several long, thin pieces of paper and apply glue to them.
16. Wrap the strips of paper, one at a time, around the masking tape covered wired
And you now have a lovely paper flower…
I truly hope this tutorial was helpful and you give it a go!
Thanks so much for reading and thank you Amy for allowing me to share this with your lovely readers!
much love,
Lucy
attending this lovely party
http://shabbynest.blogspot.com/2010/10/frugal-round-up.html


Great, great tutorial. I love it! And, I really like the stem and leaves addition. I will pop over and check your blog out too. Diana
Thanks for this tutorial! I think you did a great job, can’t wait to try one, they are beautiful!
Great tutorial for your first time. I have the same problem, and forget to take pictures “in the heat of the moment!” Your flower would look good with my “Anthropology Style” headboard. GO check it out 🙂
http://honeydewproductions.blogspot.com/2010/11/headboard-tutorial-as-promised.html
Love the flower! Thanks for the detailed tutorial.
Love it!
So beautiful! Thank you for the tutorial. These would be great made out of sheet music with a touch of glitter for the holidays.
awesome! I just love this project! I love paper-y things.
Hello! I am visiting from Met Monday. I love the paper rose. Thank you for the tutorial. I have a feeling that you have started a internet sensation!
AWesome tutorial, and beautiful flowers! I’m bookmarking this for future reference 🙂
This is awesome! Great tutorial! They turned out AMAZING!
I would love for you to come link this up at my party TALENT TUESDAY!
http://vintagewannabee.blogspot.com/
-Nichelle
Wow, this is so gorgeous! I have never seen one like it. Beautiful, thanks for the great tutorial!
Your roses are absolutely gorgeous!! I love them!
Great tutorial! The flowers turned out so great!
These are wonderful, I think my 6 year old son and I are going to try to make some tonight! I think it’s called the stamin (the center).
I’m gonna try some of these roses! I love them, thanks for sharing!
theresa
aka:tot
Those paper flowers are soooo cute! I have been looking for something (non-traditional) to put on my Christmas wreath and I think these would be perfect! Thanks for sharing!
Saw you at Backyard Eden!
Thank you so much for the beautiful tutorial. I cant wait to give it a try and to begin following your blog.
Cheers,
Aubrey
Thanks for the tutorial-love the simple beauty of these!
Great tutorial!
Melissa
http://burstsofcreativity.blogspot.com
Absolutely beautifully romantic, Lucy! I’m so glad you made the tutorial and decided to share your idea.
Thanks for linking to my party. I look forward to seeing what you link up each week.
Liz @ the Brambleberry Cottage
http://thebrambleberrycottage.blogspot.com
I can’t grow roses, but with the help of this great tutorial at least I’ll be able to make some! Thanks so much for sharing…it’s such a generous gesture for something so clever!
Debbie
P.S. BTW…I think it’s stamen.
Wow- those are lovely. Great tutorial, I will have to bookmark it for future use!
-Rochelle @ http://homesweethomebodies.blogspot.com/
very sweet. great tutorial.
“Stamens” in case no one told you yet. =)
blessings
barbara jean
Hi
Just wanted to let you know that I “ Featured” you on Santa’s Gift Shoppe Blog Hop today for your great project & inspiration! Be sure to grab the “I was featured” on Santa’s Gift Shoppe Button/Code for your sidebar! You deserve it! Thanks so much..If you’re not a follower already we’d love for you to join us…
Barb
Thanks for linking up on TALENT TUESDAY! I featured you, so be sure to come by and grab a button!
I hope you link up again!
Nichelle
http://vintagewannabee.blogspot.com
Wow! How did I never find you before??!! Lovely lovely tutorial!! Beautiful flower!
xo,
Shellagh
Hey Lucy!! I was in a store today and saw some paper flowers made from old patterns used to make dresses…they were lovely and I studied them, thinking…hhmmmm…how do you do that?!! Thank you so much for the tutorial!! I have to say, yours are 10 times prettier than the ones I saw! I will try this!!! Love it! I was out of blog land for a while…it is good to be back and to see your sweet post!
So pretty and creative! Thanks for the tutorial!
thank you for sharing – these are so pretty.
Absolutely gorgeous! I love the black and white simplicity of these flowers.
pretty! there are so many things i want do w/ old book pages!
This comment has been removed by the author.
I try to do that soon and i want to color it in red. And give it to my special someone…
Romance
I just made some of your roses using sheet music for my mom for Christmas. She is a piano teacher, and I know she will love them! Thank you so much for the idea! 🙂
Great idea. I never would have thought of that
Cool tutorial it really helps. I think the middle of a flower is the stigma. Or the pistil. Idk
Cool tutorial it really helps. I think the middle of a flower is the stigma. Or the pistil. Idk
Beautiful! I love this idea! It combines my love of flowers and books fabulously:)
just saw this how to. your flower is so pretty thank you , as i will be pinning this so i can make at a later time.
Have a good day.
So sweet, I love these flowers made out of words!